
Auto glass removal tools should be selected as a complete workflow system—not as one cutting knife placed in a toolbox.
A professional removal job may require the technician to expose hidden glass edges, release molding clips, protect painted surfaces, separate cured adhesive, lift the glass safely, and prepare the opening for replacement. The correct tool combination also depends on whether the job involves a bonded windshield, fixed quarter glass, back glass, movable door glass, or rubber-gasket-mounted glass.
This guide explains how to build a practical auto glass tool kit for modern vehicles, how to match each tool to the job, what damage risks to control, and what workshops, distributors, and private-label buyers should inspect before choosing a product line.
Table of Contents
Auto Glass Removal at a Glance
| Work Stage | Main Tool Types | Primary Risk to Control |
|---|---|---|
| Vehicle inspection | Inspection light, mirror, service information | Missing clips, cameras, sensors, or hidden fasteners |
| Trim and molding access | Nylon wedges, clip removers, molding tools | Scratched trim, broken clips, bent molding |
| Adhesive separation | Cold knife, cutting wire or cord, long knife, powered cut-out tool | Paint damage, interior cuts, glass-edge stress |
| Vehicle protection | Dash shield, headliner protector, tape, guide pins | Damage to dashboard, paint, wiring, or upholstery |
| Glass handling | Rated suction lifters, lifting frame, glass stand | Dropped glass, twisting, edge impact |
| Opening preparation | Scraper, vacuum, inspection tools | Pinchweld damage, contamination, excessive adhesive removal |
| Final validation | Scan and calibration equipment when required | Unresolved diagnostic or ADAS issues |
The most important principle is simple: the tool should match the glass mounting system, access conditions, intended workflow, and acceptable damage risk.
Why Modern Auto Glass Removal Is a System, Not a Single Cutting Job
Older tool kits were often built around one question: “Which knife cuts through the adhesive?”
That question is still important, but it is no longer enough. Modern vehicles may include:
- Flush-mounted glass with very limited external access
- Narrow gaps between the glass and body
- Fragile decorative molding
- Painted or soft-touch interior trim
- Windshield-mounted cameras and sensors
- A-pillar trim positioned near curtain airbags
- Deep or irregular urethane beads
- Fixed quarter glass in confined body openings
- Clips and fasteners hidden behind door panels
- Glass that must be preserved for reuse
As a result, the cutting tool is only one part of the removal system.
A technician may complete the adhesive cut successfully and still create expensive rework by damaging the dashboard, scratching the pinchweld, breaking a molding clip, twisting reusable glass, or overlooking a camera calibration requirement.
A better approach is to divide the job into functional stages:
1. Identify the vehicle and glass construction.
2. Create controlled access to the glass edge.
3. Protect the vehicle and nearby components.
4. Select the appropriate separation method.
5. Handle the released panel without edge impact.
6. Prepare and inspect the opening.
7. Complete required scans, calibration, and documentation.
This stage-based approach also helps distributors and tool brands build more useful kits. Instead of adding pieces only to increase the advertised tool count, each component can solve a specific workshop problem.
Identify the Glass Before Selecting the Tools
The phrase “auto glass removal” covers several very different jobs. Before choosing a knife, wire, trim tool, or lifting system, identify how the glass is mounted and whether it moves during normal vehicle operation.
Bonded Windshields, Back Glass, and Quarter Glass
Bonded fixed glass is attached to the vehicle opening with structural adhesive, commonly automotive urethane. Removal usually requires cutting through the cured bead without damaging the body flange, interior surfaces, or surrounding components.
Typical tools may include:
- Molding and cowl removal tools
- Cold knife or long knife
- Wire or synthetic cutting line system
- Powered cut-out tool
- Dash and headliner protectors
- Glass suction equipment
- Urethane preparation tools
The available working gap, adhesive depth, glass curvature, and intention to reuse the panel all affect the method.
For example, a method that works quickly on a damaged windshield may not provide enough edge control when removing intact quarter glass for reuse.
Movable Door Glass
Door glass generally follows a different workflow. It is normally connected to a window regulator or carrier inside the door instead of being bonded around its entire perimeter.
The technician may need to:
1. Remove switches, handles, covers, and hidden screws.
2. Release the interior door panel.
3. Disconnect wiring carefully.
4. Remove the moisture barrier as required.
5. Support the glass.
6. Detach the glass from the regulator or carrier.
7. Remove belt molding, weatherstrip, guides, or channels.
8. Lift the glass through the correct opening and angle.
For this work, panel wedges, clip removers, molding tools, fastener tools, sockets, and glass-support tools may be more important than a windshield cutting knife.
The Car Door Panel Removal Tool Guide provides additional information about accessing the inside of a vehicle door without unnecessarily damaging the panel or clips.
Rubber-Gasket-Mounted Glass
Some older vehicles, specialty vehicles, commercial applications, and restoration projects use rubber-gasket-mounted glass.
These jobs may require:
- Locking-strip tools
- Plastic installation or removal sticks
- Gasket hooks
- Lubrication approved for the application
- Controlled internal pressure
- Two-person handling procedures
A bonded-glass knife is not automatically suitable for gasket-set glass. The technician should first determine whether the seal will be reused, whether a locking strip is present, and how the glass should exit the opening.
The Five Tool Zones in a Complete Auto Glass Removal Kit
A complete kit does not need to contain every tool available. It should contain the right tools across five functional zones.
Access and Trim Removal Tools
These tools expose the glass edge and release nearby components before cutting begins.
Common examples include:
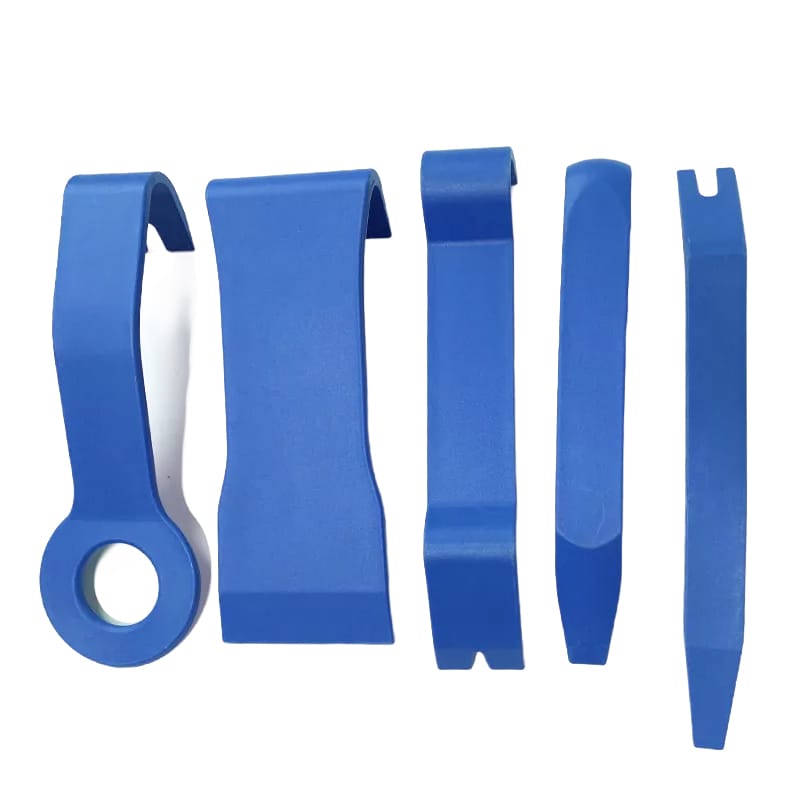
- Wide nylon panel wedges
- Narrow trim tools
- Forked clip removers
- Upholstery fastener removers
- Molding release tools
- Cowl panel tools
- Hook tools
- Small inspection mirrors
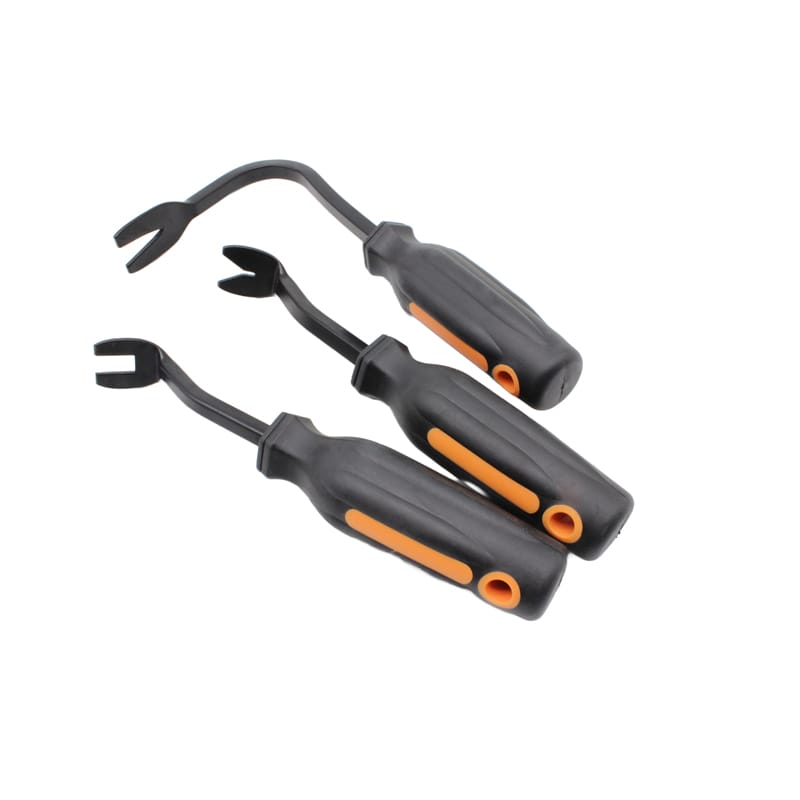
Plastic or nylon tools are generally useful around painted, textured, or soft surfaces because they reduce direct metal-to-surface contact. Metal tools can provide more precise or stronger extraction when clips are resistant, but their edges and insertion angle require greater control.
The 5pcs Trim Fastener & Molding Removal Tool Kit is designed for window trim, door trim, retaining clips, and windshield molding access. Its nylon and PP tools are relevant to surface-sensitive preparation work.
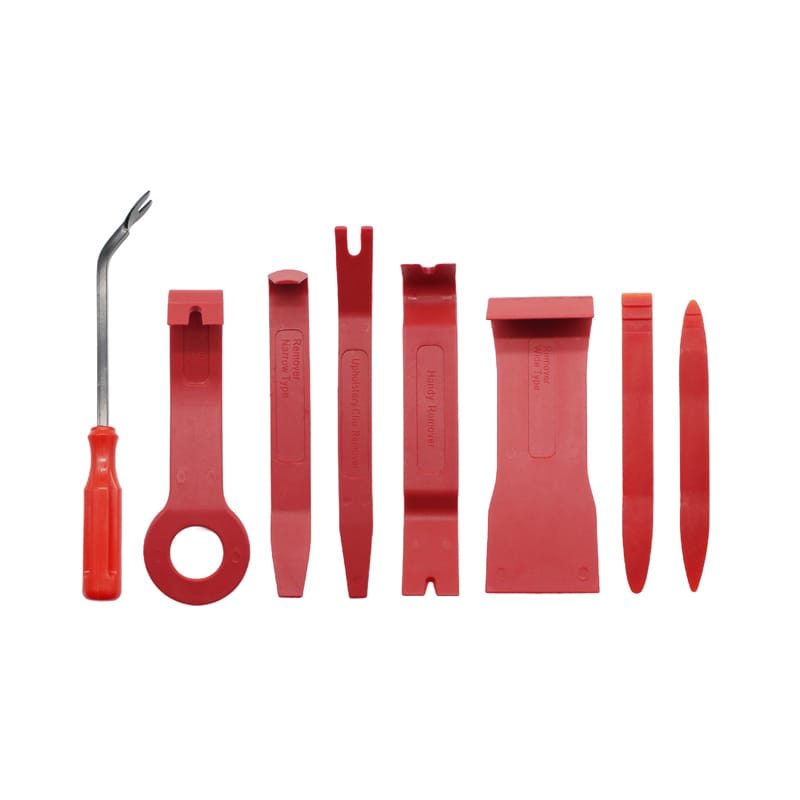
For broader access work, the 27pcs Trim Removal Master Set combines multiple tool profiles for glass replacement preparation, panel work, interior access, and body repair.
Adhesive Separation Tools
This zone includes the tools that physically separate bonded glass from cured adhesive.
The main categories are:
- Cold knives
- Long knives
- Cutting wire systems
- Synthetic cutting line systems
- Manual reel systems
- Drill-assisted systems
- Reciprocating or oscillating cut-out tools
- Application-specific blades
No single separation method is ideal for every opening. Tool selection should consider access, adhesive thickness, cutting direction, technician posture, body protection, glass reuse, and surrounding components.
Vehicle Protection Tools
Protection components are frequently overlooked because they do not perform the actual cut. However, they can determine whether a removal job remains profitable.
A practical protection group may include:
- Dashboard shields
- Headliner protectors
- A-pillar protection
- Cutting-line guide pins
- Surface-safe tape
- Fender covers
- Interior covers
- Cable and connector protection
- Glass-edge protection
Protection should be positioned before the cutting line or blade enters an area where it could contact paint, trim, wiring, upholstery, or a dashboard surface.
Glass Handling Tools
Once the adhesive or mounting system has been released, the glass must be controlled through the entire lifting movement.
Depending on the panel, this may require:
- Suction lifters rated for the intended application
- Two-person lifting
- A single-technician setting or handling frame
- A stable glass stand
- Edge-protection pads
- Transport racks
- Clean handling gloves
Glass should not be lifted only by one corner or twisted to force it out of an opening. Excessive torsion can place concentrated stress near the edge, especially when a panel is intended for reuse.
Inspect suction equipment before every use. The contact surface must be clean, the cup must seal correctly, and the equipment must be used within its documented operating limits.
Opening Preparation Tools
After removal, the technician still needs tools for inspection and preparation.
These may include:
- Controlled urethane scrapers
- Pinchweld inspection tools
- Vacuum equipment
- Clean brushes
- Lighting
- Surface preparation applicators
- Corrosion inspection tools
- Measuring and positioning aids
The objective is not automatically to remove every trace of cured adhesive or expose bare metal. The required preparation method depends on the vehicle manufacturer, adhesive system, corrosion condition, and approved installation procedure.
Aggressive scraping or grinding can damage coatings and create additional corrosion risk. Follow the relevant vehicle and adhesive instructions instead of treating every opening the same way.
How to Choose the Right Cutting Method
The best cutting method is not always the fastest method. It is the method that completes the cut while controlling damage, physical effort, setup time, and glass stress.
| Method | Best Suited To | Main Advantages | Main Limitations |
|---|---|---|---|
| Cold knife | Bonded glass with usable external access | Simple setup, portable, direct feedback | Requires physical force and controlled blade angle |
| Long knife | Localized cuts and difficult bead sections | Precise manual control, flexible reach | Can be physically demanding and difficult in confined areas |
| Wire or cord system | Flush glass, narrow gaps, controlled interior cutting | Can follow the adhesive path and reduce reliance on external blade access | Requires careful routing, protection, anchoring, and tension control |
| Powered cut-out tool | Repeated workshop work and tough adhesive beads | Higher cutting speed and reduced manual sawing effort | Blade control, vibration, access, training, and surface protection become critical |
| Manual reel system | Controlled quarter-glass, back-glass, and windshield work | Repeatable line movement and useful confined-space control | Setup quality and line placement strongly affect performance |
When a Cold Knife Makes Sense
A cold knife can be practical when the technician can access the adhesive from outside the vehicle and maintain a controlled pulling direction.
It is often valued for:
- Portability
- Simple setup
- Direct tactile feedback
- Limited dependence on batteries or power supply
- Compact storage
However, the blade should match the adhesive depth and available gap. A blade that is unnecessarily long or poorly aligned can contact the body, dashboard, or glass edge.
The Windshield Removal Tool uses a cutting blade for separating sealant around applicable bonded glass. Buyers should still verify blade shape, length, replacement availability, and the exact vehicle applications before ordering.
When Wire or Synthetic Line Makes Sense
A cutting line can be useful where:
- The glass is flush with the body
- External knife access is restricted
- A narrow adhesive path must be followed
- The technician wants to control the cut from inside the glass perimeter
- Fixed quarter glass must be approached carefully
- Body protection is a high priority
The line must be routed correctly. Poor routing can allow it to climb toward a headliner, dashboard, camera bracket, interior trim, or painted flange.
Guide pins, transparent shields, and carefully selected anchor points are therefore part of the system—not optional accessories.
When a Powered Tool Makes Sense
Powered cut-out tools are often selected for repeated professional work, deep adhesive beads, or productivity-focused environments.
Important selection factors include:
- Stroke type and controllability
- Blade compatibility
- Available blade lengths and profiles
- Tool weight
- Vibration
- Grip position
- Visibility near the cut
- Battery or air supply
- Ease of blade replacement
- Availability of replacement parts
Power should not replace control. A faster blade can also produce damage faster when the cut path is poorly protected.
For a focused comparison of separation systems, read Windshield Removal Tool Guide: Wire, Knife or Power?.
The Overlooked First Step: Trim, Molding, and Clip Access
Many glass-removal problems begin before the adhesive is touched.
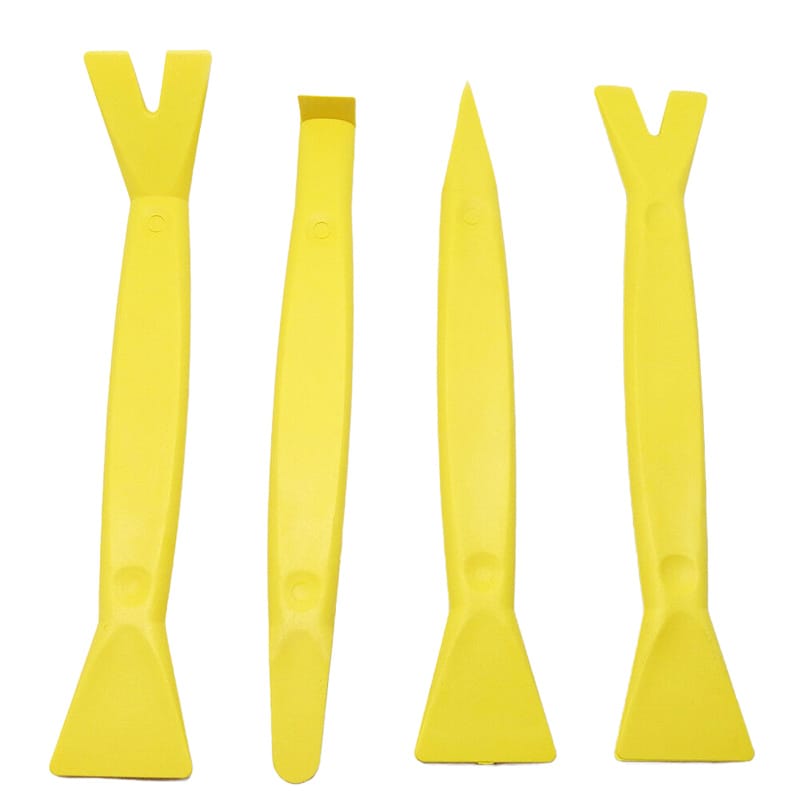
A technician who cannot expose the edge cleanly may start cutting from an incorrect angle, force a blade through a molding gap, or pull decorative trim before locating its retaining clips.
Common access components include:
- Windshield side molding
- Upper molding
- Cowl panels
- Wiper arms and covers
- A-pillar trim
- Mirror or camera covers
- Door belt molding
- Weatherstrip
- Interior door panels
- Speaker or switch trim
- Hidden fasteners
The safest sequence is usually:
1. Review the vehicle-specific removal information.
2. Identify whether molding is reusable.
3. Locate screws, clips, hooks, and sliding retainers.
4. Begin with a non-marring access tool where appropriate.
5. Apply force in the clip’s release direction.
6. Store clips and trim in a labeled sequence.
7. Replace damaged retainers rather than forcing them back into service.
A wide pry tool is useful for spreading load across a panel edge, while a narrow tool creates the first controlled opening. A forked remover should engage the fastener close to its center instead of pulling only on the trim panel.
For molding selection, see the Windshield Molding Removal Tool Guide. For door and window trim applications, see the Window Trim Removal Tool Guide.
A Damage-Controlled Auto Glass Removal Workflow
The following workflow provides a practical framework for professional shops. It should always be adapted to the vehicle manufacturer’s instructions, glass type, adhesive system, and workplace procedures.
1. Confirm the Vehicle and Scope of Work
Record the vehicle identification information and confirm:
- Which glass panel is being removed
- Whether the glass will be replaced or reused
- Whether molding and clips will be reused
- Whether cameras, sensors, antennas, heating elements, or connectors are present
- Whether the work is related to collision repair
- Whether pre-scan or post-scan procedures apply
Reusing intact glass demands a more conservative cutting and handling strategy than removing already-damaged glass.
2. Inspect the Glass and Surrounding Body
Check for:
- Existing cracks and chips
- Edge damage
- Previous replacement work
- Excess adhesive
- Corrosion
- Distorted molding
- Loose trim
- Body damage around the opening
- Interior modifications
- Wiring near the cutting path
Document pre-existing damage before beginning.
3. Establish a Clean Work Zone
Remove unnecessary items from the dashboard and surrounding area. Prepare a safe location for the removed glass, tools, clips, molding, and fasteners.
Mobile technicians should also consider:
- Weather
- Lighting
- Ground stability
- Vehicle position
- Space around the doors
- Wind exposure
- Contamination risk
4. Follow Required Electrical Precautions
When work is near cameras, sensors, connectors, heating elements, or airbag-adjacent trim, follow the manufacturer’s electrical and restraint-system procedures.
Do not assume every vehicle uses the same battery-disconnection process or waiting period.
5. Remove Trim in a Controlled Sequence
Use the correct trim, molding, and clip tools. Avoid screwdrivers as general-purpose pry tools on visible surfaces.
Photograph or label complicated fastener locations if the vehicle has multiple clip styles.
6. Protect the Vehicle Before Cutting
Install dash, headliner, pillar, and painted-surface protection before feeding a cutting line or inserting a blade.
Protection should cover the full possible path—not only the technician’s intended path. Cutting tools can change direction when adhesive thickness or body geometry changes.
7. Select and Test the Cutting Method
Choose the tool based on the actual opening. Begin in an accessible area and confirm:
- The blade or line enters the adhesive correctly
- The protector remains in position
- The cutting angle is controlled
- The tool is not contacting the glass edge or body
- The glass remains supported
Stop if resistance changes suddenly. Unexpected resistance may indicate a clip, bracket, connector, deep adhesive section, or incorrect cutting path.
8. Complete the Perimeter Without Forcing the Glass
Do not pull the glass away merely because most of the perimeter has been cut. A small uncut section can concentrate force and damage the glass, body, or interior.
Use gentle verification around the perimeter and complete remaining adhesive sections before lifting.
9. Lift, Support, and Store the Glass
Use an appropriate lifting method for the panel’s size, shape, weight, and condition.
Move the panel onto a stable stand or rack. Keep the edge away from hard floors, body panels, and other glass.
10. Inspect the Opening Before Preparation
After removal, inspect for:
- Paint scratches
- Exposed metal
- Corrosion
- Uneven adhesive
- Damaged clips
- Loose brackets
- Contamination
- Previous installation defects
- Wiring or connector damage
Only then should the opening be prepared according to the approved replacement process.
ADAS Changes the Job Before the First Cut
Many current vehicles use forward-facing cameras and other driver-assistance components near or attached to the windshield.
These systems may support functions such as:
- Lane-departure warning
- Lane-keeping assistance
- Forward-collision warning
- Automatic emergency braking
- Traffic-sign recognition
- Adaptive lighting
- Other camera-based assistance functions
The U.S. National Highway Traffic Safety Administration explains that driver-assistance technologies support the driver, who must remain attentive and responsible for vehicle operation.
For the glass technician, the important issue is not simply whether an ADAS logo appears on the vehicle. The workflow should determine:
- Whether a camera or sensor is mounted to the windshield
- Whether it must be disconnected
- Whether its bracket can be disturbed
- Whether the replacement glass must meet a specific specification
- Whether static, dynamic, or combined calibration is required
- Whether pre-scan and post-scan documentation is required
- Whether calibration conditions can be achieved at the work location
The Auto Glass Safety Council provides the Automotive Glass Replacement Safety Standard and related guidance for replacement practices. Technicians should use the vehicle manufacturer’s current service information to determine the exact calibration and validation process.
The auto glass removal tool itself does not perform calibration. However, poor removal technique can damage or disturb a bracket, connector, camera cover, or mounting area and complicate the remaining repair process.
Choosing Tools for Each Type of Glass Job
| Application | Priority Tools | Important Selection Question |
|---|---|---|
| Bonded windshield replacement | Molding tools, cutting system, protectors, lifting equipment | Is the glass flush-mounted, and is a camera attached? |
| Windshield removal for reuse | Controlled line system, complete protection, stable lifting | How will edge stress and body contact be minimized? |
| Bonded back glass | Trim tools, connector access, cutting system, lifting equipment | Are heating, antenna, spoiler, or trim connections present? |
| Fixed quarter glass | Narrow access tools, line or specialized cutting method, protectors | Is there enough working space without loading the glass edge? |
| Movable door glass | Door-panel tools, clip removers, molding tools, glass support | How is the glass attached to the regulator or carrier? |
| Molding-only service | Nylon tools, clip tools, application-specific molding remover | Is the molding clipped, hooked, taped, or integrated? |
| Collision repair removal | Access tools, cutting system, documentation and protection | Is the opening distorted or the glass under body stress? |
| Restoration or gasket-set glass | Gasket tools, plastic sticks, controlled support | Will the gasket and original glass be reused? |
A product line intended for “auto glass removal” should not consist only of windshield knives. Door-panel access, trim release, body protection, and handling are part of many real-world glass jobs.
What Makes a Tool Kit Professional Rather Than Just Large
A professional kit is not defined by the highest piece count. It is defined by functional coverage, control, repeatability, and serviceability.
Functional Variety
Every tool shape should solve a different task. A kit containing many nearly identical plastic wedges may look impressive but still fail to cover:
- Clip extraction
- Molding access
- Deep adhesive cutting
- Tight quarter-glass gaps
- Door-panel access
- Surface protection
- Glass handling
Controlled Tool Geometry
Important details include:
- Tip thickness
- Blade length
- Fork opening
- Wedge angle
- Edge smoothness
- Handle-to-shaft alignment
- Working clearance
- Flexibility under load
A trim tool that is too thick cannot enter the gap. One that is too thin may deform permanently. A cutting blade that is longer than necessary may reduce control.
Replaceable Wear Components
Professional buyers should confirm the availability of:
- Replacement blades
- Cutting wire or line
- Guide pins
- Protective sheets
- Suction-cup seals or service parts
- Fasteners and clips
- Storage inserts
- Tool-specific maintenance components
A kit becomes difficult to support when one small worn item makes the entire system unusable.
Ergonomic Fit
Technicians may perform repetitive pulling, gripping, and cutting movements throughout the day.
The NIOSH guide to selecting non-powered hand tools recommends choosing tools that can be used with less force, less repetition, and less awkward body positioning. These principles are relevant when evaluating knife handles, trim tools, pulling handles, and manual reel systems.
Useful ergonomic questions include:
- Can the wrist remain relatively neutral?
- Can the handle be gripped securely with gloves?
- Does the tool create pressure points in the palm?
- Is excessive pinch force required?
- Can the tool be controlled in confined areas?
- Is the tool unnecessarily heavy for repeated use?
- Can the technician change direction without losing grip?
Clear Tool Identification
Professional kits benefit from:
- Labeled tool positions
- Clear component lists
- Blade identification
- Application diagrams
- Safety warnings
- Replacement-part references
- QR-linked instructions
- Storage that makes missing pieces visible
These details are also valuable for OEM and private-label programs because they reduce user confusion and improve perceived product quality.
Quality Checks for Workshops, Distributors, and Private-Label Buyers
Tool photographs cannot confirm performance. Buyers should inspect samples under realistic conditions before approving bulk production.
| Inspection Area | What to Check | Why It Matters |
|---|---|---|
| Plastic trim tools | Burrs, edge smoothness, flexibility, tip recovery | Reduces scratching, cracking, and permanent deformation |
| Metal clip tools | Shaft strength, fork symmetry, surface finish | Supports centered extraction and controlled leverage |
| Knife blades | Material consistency, heat treatment, edge profile, mounting accuracy | Affects cutting control, durability, and replacement fit |
| Handles | Grip texture, alignment, impact resistance, connection strength | Influences comfort and tool stability |
| Cutting line | Diameter consistency, surface condition, compatibility, packaging | Affects routing, cutting behavior, and repeatability |
| Protectors | Coverage, puncture resistance, flexibility, visibility | Helps prevent interior and painted-surface damage |
| Suction equipment | Seal quality, cup surface, indicator function, serviceability | Critical for maintaining controlled glass handling |
| Storage | Component retention, labeling, transport protection | Reduces missing tools and edge damage |
| Instructions | Application accuracy, safety guidance, clear language | Reduces misuse and customer complaints |
| Batch consistency | Dimensions, color, hardness, assembly | Supports repeat orders and stable end-user performance |
Test the Tool as a System
Individual components should also be tested together.
For example:
- Does the trim tool create enough access for the cutting line?
- Does the guide pin work with the selected line diameter?
- Can the blade be changed while wearing gloves?
- Does the case protect cutting edges?
- Can the technician identify the correct blade quickly?
- Does the kit include protection for the areas its cutting tools can reach?
A tool can pass an individual inspection while the overall kit still fails as a workflow.
Building the Right Kit for Different Customers
Mobile Technician Kit
A mobile kit should prioritize compact storage, versatility, and independence from fixed workshop equipment.
A practical configuration may include:
- Compact trim and molding tools
- Manual cutting system
- Selected knife and blade profiles
- Dash and headliner protection
- Portable glass handling equipment
- Inspection light
- Essential scrapers and preparation tools
- Organized consumables
- Weather-resistant storage
The kit should avoid unnecessary duplication because space and transport weight matter.
High-Volume Workshop Kit
A high-volume workshop may prioritize repeatability and reduced manual effort.
The configuration may include:
- Multiple cutting methods
- Powered cut-out capability
- Dedicated blade storage
- Complete protection systems
- Stable glass stands and racks
- Multiple lifting options
- Standardized tool locations
- Replacement consumable inventory
- Maintenance and inspection records
Standardization helps technicians know where tools belong and makes missing or damaged components easier to identify.
Body Shop and Collision Repair Kit
Collision work may involve damaged openings, stressed glass, bent molding, and limited access.
The kit should support:
- Controlled trim disassembly
- Different clip styles
- Deep or irregular adhesive
- Tight quarter-glass access
- Body and interior protection
- Documentation of existing damage
- Glass preservation when parts will be reused
- Careful work around repaired or distorted structures
The 139pcs Auto Trim Removal Tool Kit includes interior disassembly tools, trim retainers, terminal tools, stereo tools, fastener removers, clip pliers, hooks, and a scraper. It can support the access and disassembly stage of broader body and door-glass work rather than acting as the adhesive cutting system itself.
Distributor and Private-Label Kit
A distributor should first define the target user rather than selecting a kit only from a supplier catalog.
Possible product levels include:
Entry-level access kit
- Nylon trim tools
- Basic clip remover
- Molding-access shapes
- Simple instructions
Professional manual removal kit
- Trim and molding tools
- Cold knife
- Multiple blades
- Cutting wire and handles
- Protectors
- Scraper tools
- Storage case
Workshop-grade system
- Manual and powered cutting options
- Complete protection group
- Glass handling equipment
- Expanded blade selection
- Consumable storage
- Maintenance documentation
OEM buyers should provide the supplier with:
- Target customer
- Intended glass applications
- Required tool functions
- Preferred materials
- Kit piece count
- Storage format
- Branding requirements
- Instruction languages
- Replacement-part strategy
- Sample testing method
This information produces a more useful tool kit than simply requesting “a large auto glass removal set.”
Common Mistakes That Cause Damage or Rework
Treating Every Window as Bonded Glass
Movable door glass, gasket-mounted glass, and bonded fixed glass require different access and release methods.
Using a Screwdriver as a Universal Trim Tool
A screwdriver concentrates force on a narrow metal edge. It can mark plastic, damage paint, crack trim, or miss the center of a retaining clip.
Selecting the Cutting Tool Before Inspecting the Gap
The technician should first understand the adhesive depth, exterior access, interior protection needs, and body shape.
Pulling Before the Perimeter Is Fully Released
A small remaining adhesive section can concentrate force and cause glass breakage, body distortion, or trim damage.
Routing Cutting Line Without Full Protection
The line can change direction as tension increases. Protect the dashboard, headliner, pillar trim, paint, brackets, and wiring throughout the possible cutting path.
Assuming More Power Always Means Better Performance
A powered tool may reduce cutting time, but poor blade selection or uncontrolled movement can increase damage risk.
Ignoring Consumable Availability
A tool system without replacement blades, lines, protectors, or service components may create downtime even when the main tool remains functional.
Removing Too Much Material From the Pinchweld
The opening should be prepared according to the approved adhesive and vehicle process. Unnecessary aggressive removal can damage coatings or expose metal.
Skipping the ADAS Plan
The workshop should know whether scanning, calibration, target setup, road conditions, or documentation will be required before scheduling the job.
Buying a Kit Based Only on Piece Count
A kit with fewer well-selected tools can be more useful than a large kit filled with repeated shapes and unrelated accessories.
Auto Glass Removal Safety Checklist
OSHA guidance on hand and power tools emphasizes proper tool condition, guarding where applicable, and attention to hand- and power-tool hazards. Appropriate eye or face protection is also important where workers may be exposed to flying particles or similar hazards.
Before beginning removal, check the following:
- Confirm the glass type and approved procedure.
- Inspect hand tools for cracks, loose handles, deformation, or sharp burrs.
- Inspect powered tools, batteries, guards, cables, and blade mounts.
- Wear suitable eye protection.
- Use hand protection appropriate for sharp glass and cutting tools.
- Keep hands away from the predicted blade or line path.
- Protect exposed skin from sharp glass edges.
- Remove damaged cutting tools from service.
- Keep the work area well lit.
- Secure loose clothing, jewelry, and long hair around powered equipment.
- Keep the floor and vehicle interior free of loose tools.
- Do not place removed glass directly on a hard floor.
- Support the glass before completing the final adhesive section.
- Use lifting equipment according to its instructions and operating limits.
- Follow the safety data and handling instructions for cleaners, primers, and adhesives.
- Follow vehicle-specific precautions around airbags, cameras, wiring, and heated glass.
- Stop the job when the tool path or resistance does not match expectations.
Training remains essential. A complete kit does not compensate for missing service information, incorrect handling, or an uncontrolled work environment.
FAQ
What are auto glass removal tools used for?
Auto glass removal tools are used to access, release, cut, lift, and prepare automotive glass components. They may support windshield removal, back-glass removal, fixed quarter-glass removal, door-glass access, molding removal, clip extraction, glass handling, and opening preparation.
What tools are needed to remove a bonded windshield?
A typical bonded-windshield workflow may require trim and molding tools, an adhesive cutting system, interior and body protectors, glass lifting equipment, scrapers, inspection tools, and vehicle-specific diagnostic or calibration resources. The exact combination depends on the windshield design and service procedure.
Is a cold knife better than a wire removal system?
Neither method is universally better. A cold knife can be compact and direct when external access is available. A wire or cord system may offer better control around flush-mounted glass and narrow gaps. The correct choice depends on access, adhesive depth, body protection, technician experience, and whether the glass will be reused.
Can windshield removal tools be used for door glass?
A windshield adhesive-cutting tool is usually not the primary tool for movable door glass. Door glass generally requires door-panel access, trim and weatherstrip removal, regulator or carrier detachment, and controlled lifting through the door opening.
Why are trim removal tools important in auto glass work?
Trim tools help expose glass edges, release molding, remove cowl panels, access door components, and preserve clips. Correct access reduces the need to force cutting tools through hidden or obstructed areas.
Are plastic trim tools always safer than metal tools?
Plastic and nylon tools generally reduce direct metal contact on delicate surfaces, but they are not suitable for every fastener. Metal tools may provide better precision and strength for resistant clips. Tool geometry, edge finish, insertion angle, and technician control are as important as material.
Does every windshield replacement require ADAS calibration?
Not every vehicle has windshield-related ADAS equipment. When a camera or sensor is present, the workshop should follow the vehicle manufacturer’s service information to determine whether calibration is required and which procedure applies.
What should a professional auto glass removal kit include?
A professional kit should cover five functions: trim access, adhesive separation, vehicle protection, glass handling, and opening preparation. It should also provide clear instructions, replaceable wear parts, organized storage, and tools matched to the intended customer.
How should distributors evaluate an auto glass tool supplier?
Distributors should assess product range, material specifications, tool geometry, sample performance, batch consistency, replacement-part availability, packaging, instructions, quality inspection, customization capability, and long-term production support.
Can auto glass removal tools be customized for private-label programs?
Tool color, logo, kit configuration, case layout, packaging, labels, barcodes, instructions, and related accessories may be customized depending on the product and manufacturing requirements. Buyers should define the intended market and tool functions before approving the final kit.
Conclusion
The best auto glass removal tools do more than cut adhesive. They create a controlled process from the first trim clip to the final inspection of the glass opening.
A practical tool system should help the technician:
- Identify the correct removal method
- Access glass edges without damaging trim
- Protect paint, dashboards, headliners, and wiring
- Select an appropriate cutting method
- Handle released glass safely
- Prepare the opening according to the approved procedure
- Recognize ADAS, sensor, and documentation requirements
For workshops, the right kit reduces uncertainty, damage, physical strain, and rework. For distributors and private-label buyers, a function-based product line creates clearer market positioning than a generic set built only around piece count.
Explore the available car body and interior tools, including molding, panel, clip, and windshield removal products. For OEM, ODM, wholesale, customized packaging, or tool-kit development, contact our team with your target application, market, required components, and branding needs.