
A windshield replacement can fail before the new glass is opened. Broken molding, scratched paint, a damaged dashboard, uncontrolled glass movement, or an overlooked camera bracket can turn a routine job into costly rework. A professional windshield removal tool kit should therefore support the complete removal process—not just provide one knife or an impressive piece count.
The best windshield removal tool kit covers five stages: accessing the glass edge, separating adhesive, protecting the vehicle, handling the released glass, and preparing the opening. This guide explains the 12 components that matter most, how to match them to different vehicles, and how workshops, distributors, and OEM buyers can evaluate a kit for safer, more consistent work.
Table of Contents
Why Piece Count Is the Wrong Way to Judge a Windshield Removal Tool Kit
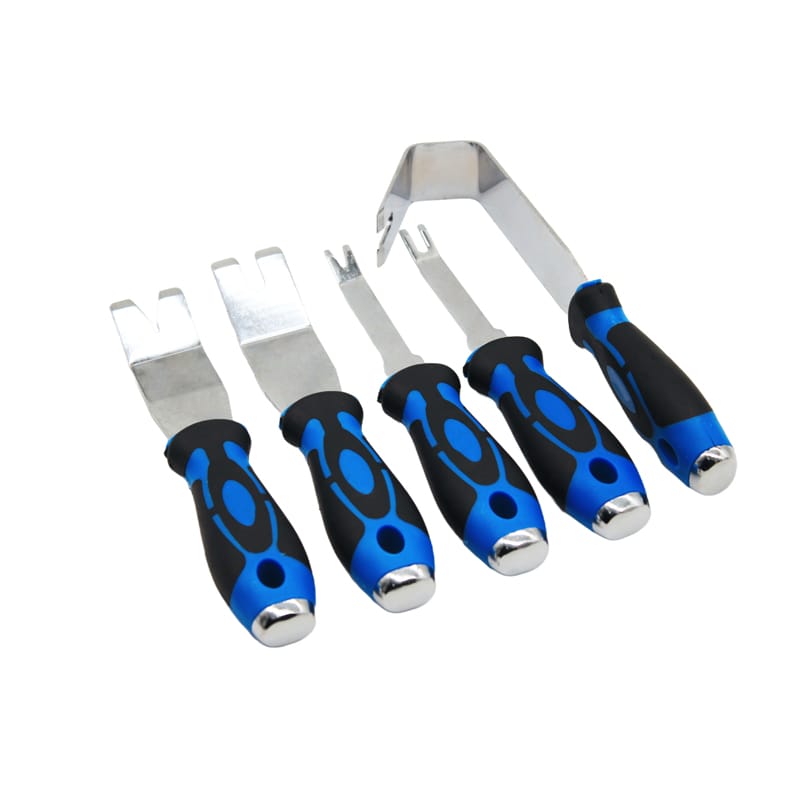
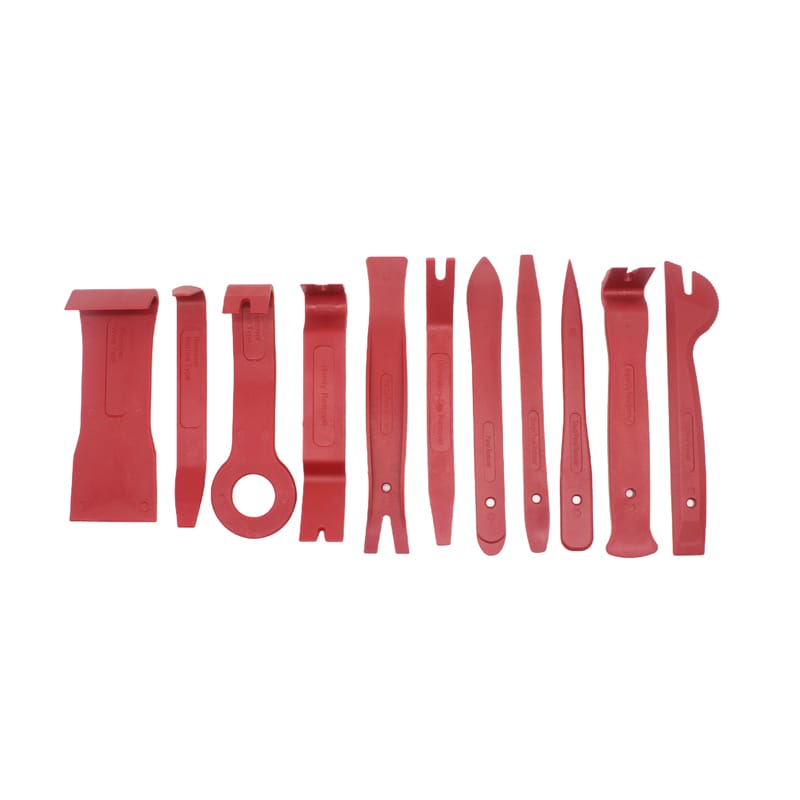
A large case may contain repeated pry tools and several similar blades while still missing protection, handling, or preparation equipment. A practical windshield removal tool kit should answer six questions:
- How will the technician expose the glass edge?
- How will cured adhesive be separated?
- How will paint, trim, wiring, the dashboard, and the headliner be protected?
- How will the glass be supported during the final cut?
- How will the panel be lifted and stored?
- How will the opening be inspected and prepared?
If a set cannot answer all six, it is better described as a cutting set, trim set, or accessory set. Function-first design also improves product pages because every component can be connected to a real stage, risk, and user need.
Inspect the Vehicle Before Choosing the Removal Method
The correct combination depends on the vehicle, adhesive path, glass condition, and whether the panel will be discarded or preserved. Before opening a windshield removal tool kit, check:
- Whether the windshield is flush-mounted or surrounded by accessible molding
- Whether the glass is cracked or intended for reuse
- Adhesive depth and available working space
- Cameras, sensors, antennas, heating elements, and connectors
- Cowl, side-molding, and A-pillar removal requirements
- Dashboard clearance and previous adhesive buildup
- Corrosion or body damage around the opening
- Scan or calibration requirements after replacement
A damaged windshield may allow a different strategy from intact glass being removed for body repair. The inspection also determines which protectors, blades, line-routing tools, and lifting equipment must be prepared before cutting begins.
The 12 Essentials in a Professional Windshield Removal Tool Kit
The following list provides a practical foundation. The exact blade profiles, line types, and lifting equipment should still be selected for the intended market and vehicle range.
| Essential Component | Main Function | Risk It Helps Control |
|---|---|---|
| 1. Non-marring trim wedges | Create initial access around molding and cowl panels | Scratched or cracked trim |
| 2. Clip and molding removers | Release hidden retainers and windshield molding | Broken clips and bent molding |
| 3. Cold knife with suitable blades | Cut accessible sections of cured adhesive | Uncontrolled blade movement |
| 4. Cutting wire or synthetic cord | Separate adhesive in narrow or flush-mounted openings | Limited external access |
| 5. Wire handles, reel, or feed tools | Control line tension and movement | Hand fatigue and unstable pulling |
| 6. Long knife or specialized blade | Reach deep or difficult adhesive sections | Incomplete perimeter cuts |
| 7. Dashboard and headliner protectors | Shield interior surfaces from blades and line | Cuts, scratches, and punctures |
| 8. Guide pins and line protectors | Keep cutting line away from vulnerable areas | Damage to paint, trim, and wiring |
| 9. Suction lifters | Control glass during lifting and transport | Dropped or twisted glass |
| 10. Glass stand or edge support | Store the removed panel securely | Edge impact and contamination |
| 11. Controlled scrapers | Prepare cured adhesive and remove selected residue | Pinchweld coating damage |
| 12. Inspection and organization tools | Support lighting, documentation, and tool control | Missed damage and lost components |
A windshield removal tool kit can include additional items, but each addition should support a real task. Duplicate tools are useful only when they provide a second size, profile, material, or working angle.
Cutting Tools: Match the Method to the Adhesive Path
Cutting tools are the core of a windshield removal tool kit, but one design is not ideal for every opening. Common options include cold knives, long knives, cutting wire or synthetic cord, and powered cut-out tools.
Cold Knife
A cold knife is useful when external access is available and the technician can maintain a controlled pull angle. It is compact, quick to set up, and provides direct feedback. Blade length should match adhesive depth: a blade that is too long can reduce control, while one that is too short may leave part of the bead uncut.
The site’s Windshield Removal Tool is designed for bonded automotive glass work. When specifying a cold knife for a windshield removal tool kit, buyers should confirm blade material, blade profile, mounting accuracy, handle grip, pull-cable connection, and the availability of replacement blades.
Cutting Wire or Synthetic Cord
Wire or cord is useful for flush glass, narrow gaps, and restricted external access. A complete windshield removal tool kit should pair the line with feed tools, handles or reels, guide pins, and protective shields. Line diameter, surface, strength, and routing all affect performance.
Poor routing can move the line toward the dashboard, headliner, painted flange, camera bracket, or wiring. Protection and anchor placement are therefore part of the cutting method.
Long Knife and Specialized Blades
Long knives help reach corners, lower edges, and deep adhesive sections. They require controlled hand position and clear protection behind the cutting path. Blade profiles should be labeled so technicians can identify the correct component quickly.
Powered Cut-Out Tool
Powered tools may reduce manual effort in high-volume work, but they increase the need for blade control, maintenance, vibration management, and training. Many workshops benefit from keeping more than one cutting method so the lowest-risk option can be selected for each opening.
For a detailed comparison of manual and powered approaches, read the Windshield Removal Tool Guide: Wire, Knife or Power?.
Trim, Molding, and Cowl Access Tools
Many glass-removal problems begin before the adhesive is touched. Hidden clips, rigid molding, cowl panels, and A-pillar trim can block the cutting path. Forcing a blade through these parts increases the chance of broken trim and poor alignment.
A windshield removal tool kit should include wide and narrow non-marring wedges plus clip or molding removers for common retaining systems. Wide tools distribute pressure; narrow tools create the initial gap; forked removers should engage near the fastener center.
The 5pcs Trim Fastener & Molding Removal Tool Kit is intended for window and door trim, retaining clips, and windshield molding access. The related Car Body and Interior Tools category also includes trim, fastener, door-panel, and molding tools that support glass-work preparation.
Before prying, identify screws, sliding clips, hooks, and one-time-use retainers. Follow the fastener’s release direction instead of relying on sudden force. The access tools in a windshield removal tool kit should help expose the adhesive path without creating new damage that must be repaired later.
Vehicle Protection Is Part of the Tool Kit
A cutting tool can complete the adhesive separation and still create an unprofitable job if it damages the vehicle. For this reason, protection components should be treated as essential parts of a windshield removal tool kit.
The protection group may include:
- Dashboard shields
- Headliner protectors
- A-pillar shields
- Transparent line guards
- Guide pins
- Surface-safe tape
- Fender and interior covers
- Glass-edge pads
Protection should cover the possible tool path, not only the intended path. Wire can change direction under tension, and a blade can move when adhesive thickness changes. Transparent protectors are useful because they preserve visibility while separating the cutting system from vulnerable surfaces.
A useful windshield removal tool kit also makes protection easy to install. If a shield is awkward, too small, or difficult to position, technicians may be tempted to skip it. Kit design should therefore consider storage size, flexibility, puncture resistance, and access to corners.
Glass Handling Tools Are Not Optional
The final adhesive section is a high-risk moment because the glass can move as support decreases. A windshield removal tool kit should include—or be clearly paired with—handling equipment suited to the panel and workflow:
- Rated suction lifters
- A lifting frame where appropriate
- Stable glass stands
- Edge-protection pads
- Clean handling gloves
- Transport supports
Inspect suction surfaces, seals, indicators, and handles before use. Support the glass before the final cut, verify complete release, and lift with balanced movement. Do not force the panel away while a small adhesive section remains; concentrated force can damage the edge or body flange.
Mobile kits may use compact handling equipment, while workshop systems can include larger frames and dedicated stands. Product descriptions should clearly state which handling tasks are covered and which equipment is separate from the windshield removal tool kit.
Preparation Tools for the Adhesive Bed and Pinchweld
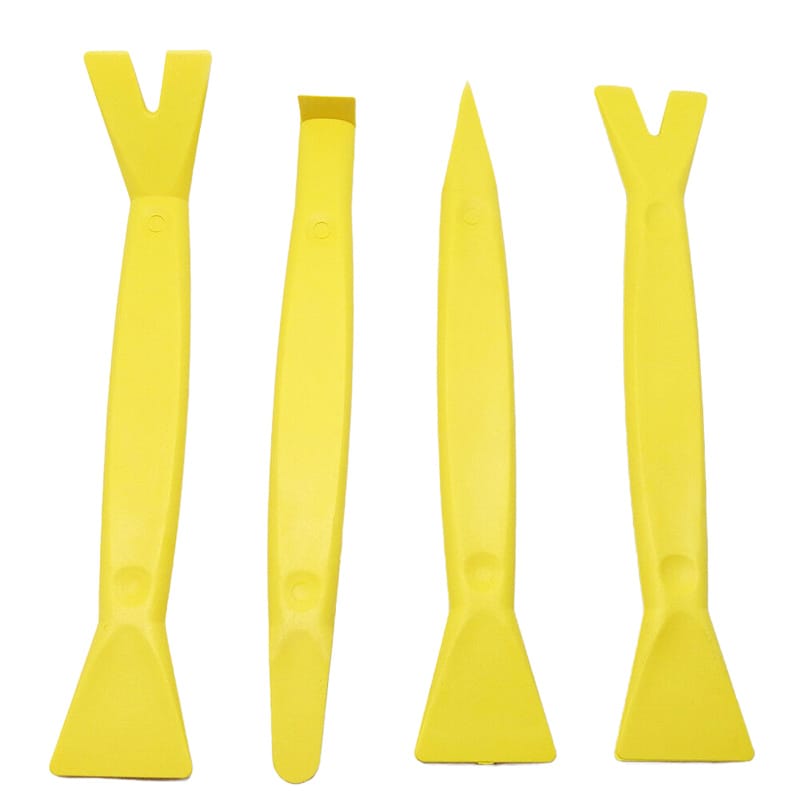
Removal is not complete when the glass leaves the opening. The technician must inspect the adhesive bed, body flange, corrosion condition, clips, brackets, and surrounding surfaces before installation work continues.
A windshield removal tool kit should include controlled scrapers in appropriate materials and profiles. The objective is not automatically to grind the opening to bare metal. Excessively aggressive scraping can damage coatings and create additional repair work.
Useful preparation items include:
- Narrow adhesive scrapers
- Wider controlled scrapers
- Plastic scrapers for sensitive surfaces
- Inspection light
- Mirror
- Vacuum or debris-control accessories
- Small brushes
- Component trays or labeled bags
The Automotive Scraper Tool Guide explains why scraper material should be matched to the surface, residue, and damage tolerance rather than treated as one universal solution.
Always follow the vehicle and adhesive-system procedure for the remaining cured adhesive, exposed metal, corrosion, primer, and preparation steps.
ADAS-Aware Windshield Removal Requires Better Planning
Many vehicles use windshield-mounted cameras or components supporting forward collision warning, lane departure warning, automatic emergency braking, lane centering, and lane keeping assistance. NHTSA’s driver-assistance overview explains the role of these technologies and the driver’s continuing responsibility.
A windshield removal tool kit does not perform calibration, but poor access or cutting can damage a camera bracket, wiring, cover, or mounting area. Before work begins, determine:
- Whether a camera or sensor is windshield-mounted
- Whether disconnection or scanning is required
- Whether the bracket must remain undisturbed
- Whether static, dynamic, or combined calibration applies
- What working conditions and documentation are required
The Auto Glass Safety Council provides information about the current Automotive Glass Replacement Safety Standard and industry best-practice guidance.
How to Configure a Windshield Removal Tool Kit for Different Users
Mobile Technician Kit
Prioritize compact storage, versatility, weather-resistant organization, manual cutting options, foldable protectors, portable suction equipment, inspection lighting, and essential scrapers.
A mobile windshield removal tool kit should minimize duplication without sacrificing the ability to work around different molding systems and adhesive depths. Consumables should be easy to inventory, and sharp components should remain isolated during transport.
High-Volume Workshop Kit
Prioritize repeatability and replacement-part support. A workshop windshield removal tool kit may include manual and powered cutting options, expanded blades, line-feed tools, multiple protectors, suction lifters, stable stands, and organized consumables.
Body Shop Kit
Body shops may remove intact glass for reuse or work around distorted openings. Their kits should emphasize controlled line routing, multiple access angles, glass preservation, strong protection, and documentation.
A body-shop windshield removal tool kit should also support careful trim removal because collision-related distortion can place unusual stress on molding, glass edges, and the body opening.
Distributor or Private-Label Kit
Define the target user first. Entry-level, professional manual, and workshop-grade versions create a clearer product ladder than one oversized mixed set. Each level should have a distinct purpose, component list, packaging format, and replacement-parts plan.
Quality Control Checklist for B2B Buyers
A product photo cannot prove whether a windshield removal tool kit will perform consistently. Buyers should inspect samples and verify materials, dimensions, assembly, packaging, and repeat-production controls.
| Inspection Area | What to Check |
|---|---|
| Plastic trim tools | Smooth edges, controlled flexibility, tip recovery |
| Metal clip tools | Fork symmetry, shaft strength, finish, alignment |
| Cutting blades | Material consistency, edge profile, mounting fit, straightness |
| Knife handles | Grip stability, cable connection, fastener security |
| Wire or cord | Diameter consistency, condition, system compatibility |
| Protectors | Coverage, puncture resistance, visibility, flexibility |
| Suction tools | Seal quality, cup surface, handle function, serviceability |
| Scrapers | Tip geometry, material, control, replaceable parts |
| Case or pouch | Retention, labels, edge protection, missing-tool visibility |
| Instructions | Correct applications, safety guidance, component identification |
NIOSH guidance on non-powered hand tools recommends selecting tools that can be used with less force, less repetition, and less awkward body positioning.
For this category, test handle diameter, wrist angle, grip texture, tool weight, and pressure points during realistic work. A well-designed windshield removal tool kit should reduce unnecessary strain while preserving tool control.
OEM and Private-Label Development
A windshield removal tool kit can be configured for different users and sales channels, but customization should begin with function rather than color. The specification should define:
- Target customer and vehicle range
- Manual or powered cutting method
- Blade profiles and line type
- Protection and trim-access components
- Handling and preparation equipment
- Storage format and replacement-parts plan
- Instruction languages, logo, labels, and packaging
Decide whether blades, cutting line, protectors, and inserts will have separate reorder codes. Then test the windshield removal tool kit as a system: confirm that the trim tool creates enough access, guide pins match the line, protectors cover the likely path, blades fit accurately, and the case isolates sharp parts.
For custom configuration, bulk supply, logo application, or packaging development, buyers can contact Fengjie Tools with their target market and workflow requirements.
A Safer Workflow for Using the Kit
Vehicle-specific service information and the selected adhesive procedure should always take priority.
1. Confirm the Job
Record the vehicle, glass type, condition, reuse requirement, sensor equipment, and expected calibration process.
2. Inspect and Document
Photograph cracks, molding damage, corrosion, previous adhesive, body distortion, and interior condition.
3. Organize the Windshield Removal Tool Kit
Lay out access, cutting, protection, handling, and preparation groups. Replace damaged tools before work begins.
4. Remove Trim and Install Protection
Locate hidden fasteners, use the lowest-risk access tool first, and protect the dashboard, headliner, pillars, paint, wiring, and camera area.
5. Select the Cutting Method
Choose a cold knife, line system, long blade, or powered method according to access and adhesive geometry.
6. Support and Release the Glass
Attach suitable handling equipment before the final cuts. Stop if resistance changes unexpectedly and check for deep adhesive, brackets, or an incorrect path.
7. Lift and Inspect
Verify complete release, lift evenly, place the glass on a stable stand, and inspect the pinchweld, coatings, corrosion, clips, brackets, and adhesive bed.
This sequence turns a windshield removal tool kit into a controlled workflow rather than a collection of loose tools.
Common Buying and Usage Mistakes
Buying by Piece Count Alone
Repeated shapes do not replace missing protectors, handling equipment, or preparation tools. A balanced windshield removal tool kit should be evaluated by function.
Treating One Knife as Universal
Adhesive depth, access, glass condition, and reuse requirements vary. A professional windshield removal tool kit should provide more than one controlled option.
Omitting Access and Protection Tools
Poor access creates poor cutting angles, while missing protection exposes dashboards, paint, headliners, wiring, and trim to damage.
Ignoring Replacement Parts
A windshield removal tool kit without blades, line, protectors, or service components can create unnecessary downtime.
Using Damaged Tools
OSHA’s hand and power tool guidance explains that improperly used or maintained tools can cause serious injuries. Loose blade mounts, damaged handles, deformed trim tools, and worn lifting equipment should be removed from service.
Skipping Vehicle-Specific Information
A windshield removal tool kit cannot replace service procedures, adhesive instructions, calibration requirements, or technician training.
FAQ
What should a windshield removal tool kit include?
A windshield removal tool kit should include trim and molding tools, at least one controlled adhesive-cutting method, dashboard and headliner protection, line guides, handling equipment, scrapers, inspection tools, and organized storage.
Is a cold knife enough for windshield removal?
It may be suitable for accessible adhesive sections, but flush glass, deep beads, confined corners, or glass intended for reuse may require wire, cord, long blades, or another method.
Is cutting wire better than a cold knife?
Neither is universally better. Wire or cord suits narrow and flush-mounted openings, while a cold knife offers direct control where external access is available. The best windshield removal tool kit supports the method that matches the opening.
Why does the kit need trim removal tools?
Trim and molding often block the glass edge. Dedicated tools release clips and create a cleaner cutting path with less risk of breaking nearby components.
Why are dashboard protectors important?
Blades and cutting line can move outside the intended path. Protectors create a barrier between the cutting system and the dashboard, headliner, pillars, wiring, or paint.
Can the same kit be used on every vehicle?
The main groups may work across many vehicles, but blade profile, routing, trim access, sensor precautions, and handling requirements differ. Adapt the windshield removal tool kit to the vehicle procedure.
How should distributors evaluate a supplier?
Check material specifications, blade consistency, handle assembly, line compatibility, protector coverage, suction-tool serviceability, instructions, sample performance, batch consistency, and replacement-part support.
Can a windshield removal tool kit be customized?
Yes. A windshield removal tool kit may be customized in configuration, color, logo, case layout, packaging, instructions, labels, barcodes, blade selection, and accessories according to manufacturing capability and market needs.
What is the difference between a cutting kit and a complete removal kit?
A cutting kit mainly separates adhesive. A complete windshield removal tool kit also supports access, protection, handling, inspection, and preparation.
Conclusion
A professional windshield removal tool kit should be judged by workflow coverage, not by the largest number printed on the case. The most useful system helps technicians expose the glass edge, choose a suitable cutting method, protect the vehicle, support the panel, inspect the opening, and prepare for the next stage of replacement.
For workshops, this approach can reduce damage, physical strain, missing tools, and inconsistent procedures. For distributors and OEM buyers, it creates a clearer product line with meaningful entry-level, professional, and workshop-grade options.
Explore the Windshield Removal Tool, related Car Body and Interior Tools, or contact the supplier to discuss a windshield removal tool kit for wholesale, OEM, or private-label requirements.