
Windshield removal does not always begin with cutting urethane.
For many vehicles, the technician first needs to remove exterior molding, weatherstrip sections, clips, retainers, cowl components, or surrounding trim before the bonded glass can be accessed safely. This preparation stage may look simple, but it is one of the easiest places to create unnecessary scratches, broken clips, bent molding, or damaged painted surfaces.
That is why choosing the correct windshield molding removal tool matters.
A screwdriver or generic pry bar may create enough leverage to lift trim, but it does not necessarily provide the control required around painted bodywork and fragile automotive molding. Professional auto glass shops usually benefit from purpose-designed tools with thin profiles, controlled leverage, appropriate tip geometry, and materials selected for the surface being handled.
This guide explains how a windshield molding removal tool works, how nylon and metal tools differ, which tip shapes suit different jobs, and what professional workshops, distributors, and OEM buyers should evaluate when choosing a complete automotive glass trim tool range.
Table of Contents
What Is a Windshield Molding Removal Tool?
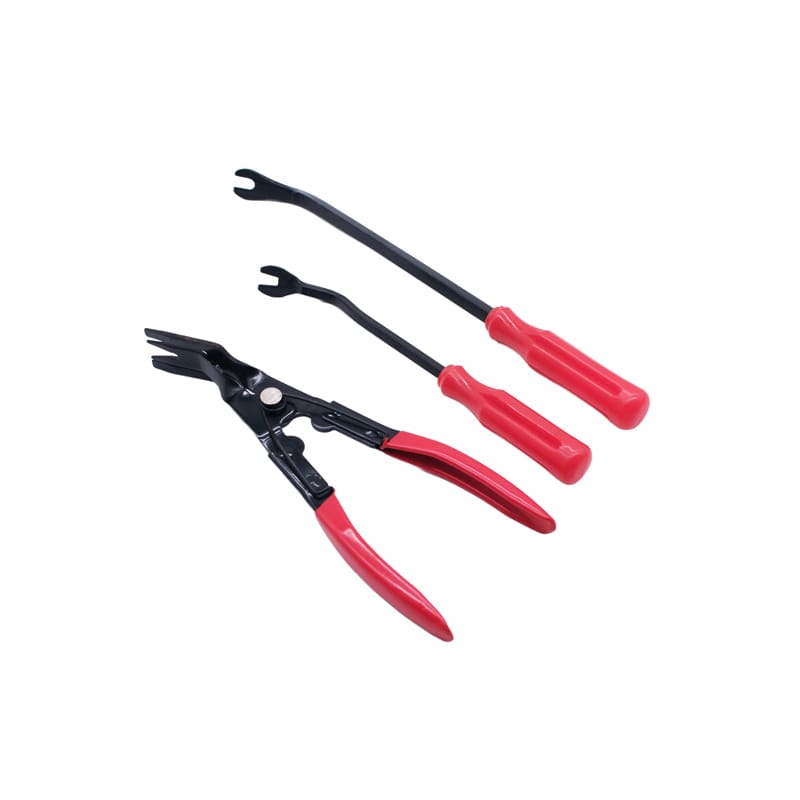
A windshield molding removal tool is designed to release trim, molding, clips, retainers, or surrounding components located near automotive glass.
Depending on the design, the tool may slide underneath a trim edge, separate a molding from its retaining clip, lift a push fastener, reach behind a clip, or create enough controlled clearance to remove a component without excessive bending.
Common forms include:
- Flat nylon wedges
- Narrow plastic pry tools
- Forked clip removers
- Hook-style molding tools
- Metal trim tools
- Upholstery fastener removers
- Pull-type clip tools
- Long-reach molding tools
Fengjie’s 5pcs Trim Fastener & Molding Removal Tool Kit is designed for window and door trim work and includes nylon/PP tools that can be used around windshield molding and related vehicle trim.
Professional users can also browse the broader Automotive Glass Removal tool category when building a more complete glass repair setup.
Why Windshield Molding Is Easy to Damage
Automotive molding is designed primarily to fit, seal, cover, locate, or finish an assembly. It is not necessarily designed to tolerate aggressive prying.
Depending on the vehicle, windshield-area trim may use:
- Snap clips
- Push retainers
- Hidden locking tabs
- Channel-mounted molding
- Adhesive-backed sections
- Interlocking plastic retainers
- Combination clip-and-channel systems
The molding itself may also become less flexible with age or environmental exposure.
This means a technician cannot assume that a trim strip should simply be pulled upward.
When resistance is encountered, the first question should be:
Where is the molding actually retained?
A properly selected windshield molding removal tool allows the technician to direct force closer to the retaining point instead of bending the entire trim section.
That distinction can significantly reduce unnecessary component damage.
Windshield Molding Removal Tool vs Screwdriver
A flat screwdriver is sometimes used as an improvised trim remover because its blade is thin and readily available.
However, its geometry was not designed for automotive trim work.
| Feature | Windshield Molding Removal Tool | Standard Screwdriver |
|---|---|---|
| Primary purpose | Trim and fastener removal | Screw driving |
| Surface-friendly options | Yes | Usually no |
| Wide leverage surface | Available | Limited |
| Forked clip access | Available | No |
| Flexible nylon options | Yes | No |
| Risk of concentrated pressure | Lower with proper selection | Higher |
| Multiple tip shapes | Common in kits | Limited |
| Suitable for painted trim areas | Better when correctly selected | Higher damage risk |
The sharp metal edges of a screwdriver can concentrate force on a very small area.
On a painted flange or plastic trim section, this can create scratches, indentations, or visible marks before enough lifting force is generated.
A purpose-designed windshield molding removal tool spreads leverage more appropriately and gives technicians a wider choice of working angles.
Nylon vs Metal Windshield Molding Removal Tools
One of the most important buying decisions is material selection.
Neither nylon nor metal is automatically better.
They solve different problems.
Nylon and PP Trim Tools
Plastic trim tools are widely used when surface protection is the priority.
Typical applications include:
- Decorative molding
- Interior pillar trim
- Door trim
- Dashboard panels
- Weatherstrip edges
- Window trim
- Light-duty clips
- Painted or visible surfaces
A nylon windshield molding removal tool can flex slightly under load, reducing the chance of creating a sharp pressure point.
It is particularly useful during the first stage of disassembly, when the technician needs to create a small gap and identify the location of hidden clips.
Fengjie’s 11pcs Trim Fastener and Molding Removal Tool Set uses nylon/PP tools in several shapes for internal and external vehicle molding and trim fasteners.
Metal Trim and Clip Removers
Metal becomes useful when more concentrated force is necessary.
Typical applications include:
- Stubborn push clips
- Deep retainers
- Strong upholstery fasteners
- Clips requiring forked engagement
- Fasteners with limited access
- Components where a very thin tool must reach behind the clip
Metal tools should be used carefully around finished surfaces.
The technician should position the working end against the fastener whenever possible rather than using the painted panel as the primary leverage surface.
Which Material Should a Professional Kit Include?
For mixed automotive glass and door repair, the answer is usually both.
A practical combination might include:
- Wide nylon wedge
- Narrow nylon wedge
- Forked plastic remover
- Thin metal clip remover
- Long-reach fastener remover
- Hook tool
This gives the workshop several ways to approach the same area without forcing an unsuitable tool into the job.
Tip Shape Matters More Than Many Buyers Expect
Two trim tools made from the same material can behave very differently because of their tip geometry.
Wide Flat Wedge
A wide wedge spreads load across a larger surface.
It works well for:
- Starting panel separation
- Lifting broad molding sections
- Interior trim
- Creating an inspection gap
Because pressure is distributed across the wider tip, this shape can be useful around visible surfaces.
Narrow Wedge
A narrow tip fits into smaller gaps.
It is useful for:
- Tight molding edges
- Narrow trim seams
- Locating hidden clips
- Starting separation where access is restricted
However, a narrow tip concentrates more pressure than a wide one, so the operator still needs to control leverage.
Forked Clip Remover
A forked windshield molding removal tool can position force around both sides of a clip stem.
This is especially useful when the goal is to extract the fastener rather than simply lift the panel.
Correct fork width matters.
A fork that is too narrow may not reach the base of the clip. A tool that is too wide may apply pressure mainly to the surrounding trim.
Hook Tool
A hook provides access behind components that cannot easily be reached from the front.
Hooks can help with:
- Small retaining tabs
- Rubber seals
- Weatherstrip edges
- Hidden clips
- Wiring retainers
Because hooks concentrate force on a small area, they require more careful use around soft materials.
How to Identify the Retaining System Before Removal
Professional trim removal should begin with inspection, not force.
Before inserting a windshield molding removal tool, examine how the component is likely to be held in position.
Look for Visible Clip Locations
Some moldings show small changes in position, gaps, or stiffness where clips are located.
Pressing lightly along the molding may help identify the retaining points.
Check the End of the Molding
The end of a trim strip can reveal whether it slides into a channel, snaps over clips, or wraps underneath another component.
This information often determines which direction the molding should move.
Inspect Adjacent Components
A windshield molding may be partially trapped by:
- A-pillar trim
- Cowl panels
- Roof trim
- Door seals
- Corner covers
- Wiper-related components
Removing surrounding parts first may reduce the amount of force needed.
Do Not Assume Upward Movement
Some clips release upward.
Others release sideways or require the molding to slide after the retaining point is disengaged.
Pulling in the wrong direction can break the molding even when the correct windshield molding removal tool is being used.
Windshield Molding vs Door Window Trim Removal
Although both jobs involve automotive trim, the working conditions can be different.
Windshield molding surrounds bonded glass and may sit close to urethane, painted pinchwelds, cowl components, sensors, or pillar trim.
Door window trim can involve:
- Belt molding
- Weatherstrip
- Window run channels
- Door panel trim
- Mirror trim
- Window regulator access
- Door clips and retainers
A windshield molding removal tool may work for some door trim jobs, but automotive door repair normally requires a broader set of tools.
For example, Fengjie’s 4pcs Plastic Auto Car Door Panel Trim Removal Tools Kit contains wide-edge, narrow-edge, pull-type, and handle-style tools for interior and exterior trim.
That makes it useful when access to the window regulator, door glass, speaker, wiring, lock mechanism, or internal fasteners requires removal of the door panel first.
Windshield Molding Removal Before Glass Cutting
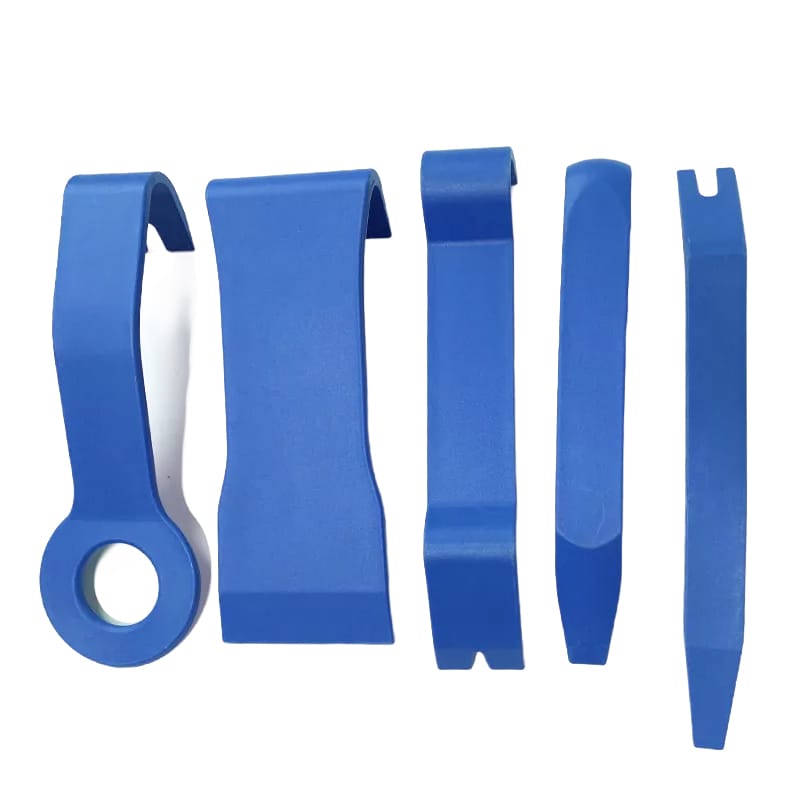
Molding removal is often only the preparation stage of windshield replacement.
Once surrounding components have been cleared, technicians may still need dedicated tools to separate the bonded glass from the vehicle.
The typical sequence may involve:
- Inspecting the vehicle
- Protecting visible surfaces
- Removing wipers or cowl components where necessary
- Removing or releasing windshield molding
- Clearing pillar or surrounding trim
- Accessing the adhesive bead
- Cutting the windshield adhesive
- Handling and removing the glass
- Preparing the bonding area
For the glass-cutting stage, see the related guide: Windshield Removal Tool Guide: Wire, Knife or Power?
A molding tool and a glass-cutting tool therefore serve different purposes.
The windshield molding removal tool exposes the work area.
The windshield cutting system separates the bonded glass.
A professional kit should not confuse these two functions.
How to Remove Windshield Molding With Less Risk
Exact procedures depend on the vehicle, but several general principles improve control.
1. Inspect Before Inserting a Tool
Determine where the trim starts and ends, which components overlap it, and where clips may be located.
Do not begin at the most visible part of the molding simply because it is easy to reach.
2. Start With the Least Aggressive Tool
When possible, begin with a nylon wedge rather than a sharp metal tool.
The objective is often to create enough space to inspect the fastener.
3. Work Close to the Clip
Once the retaining point is identified, reposition the windshield molding removal tool closer to it.
This reduces bending through the length of the molding.
4. Apply Gradual Pressure
A clip that does not release immediately may require a different direction rather than greater force.
Short, controlled movements usually provide more feedback than one aggressive pull.
5. Support the Released Section
Do not allow a long piece of molding to hang from the remaining clips.
Support it as the work progresses.
6. Store Removed Clips Properly
Small fasteners are easy to lose.
A workshop should separate reusable clips, damaged clips, and fasteners that require replacement.
7. Inspect Before Reinstallation
Before reinstalling molding, check:
- Clip condition
- Molding deformation
- Retainer position
- Channel cleanliness
- Adjacent weatherstrip condition
Reusing a damaged clip can create loose trim, noise, or poor fit even when the molding itself is still usable.
How Tool Thickness Affects Access
Thickness is one of the most overlooked specifications when selecting a windshield molding removal tool.
A very thick tool may be strong, but it can require a larger opening before the tip can reach the fastener.
A very thin tool enters narrow seams more easily but may flex excessively under load.
Professional kits benefit from several thicknesses.
Thin Tools
Best for:
- Tight trim gaps
- Initial entry
- Hidden clip access
- Delicate molding edges
Medium-Thickness Tools
Best for:
- General trim work
- Door panels
- Moldings
- Moderate leverage
Heavy Tools
Best for:
- Larger panels
- Stronger clips
- Areas where additional leverage is needed
The strongest tool is not always the most useful.
Good access often allows a smaller amount of accurately placed force to outperform a much stronger tool used from the wrong angle.
Why Edge Finish Is an Important Quality Detail
When sourcing plastic or metal trim tools, edge quality deserves close inspection.
A rough molding line, sharp burr, or uneven tool edge can mark the component being protected.
For nylon tools, buyers should inspect:
- Mold flash
- Sharp edges
- Tip symmetry
- Surface defects
- Uneven thickness
- Warping
For metal tools, examine:
- Burrs
- Grinding marks
- Fork symmetry
- Edge radius
- Surface finish
- Tip deformation
A professional windshield molding removal tool should arrive ready for controlled work.
Technicians should not need to sand or reshape new tools before they can safely use them.
When a Clip Remover Is Better Than a Pry Tool
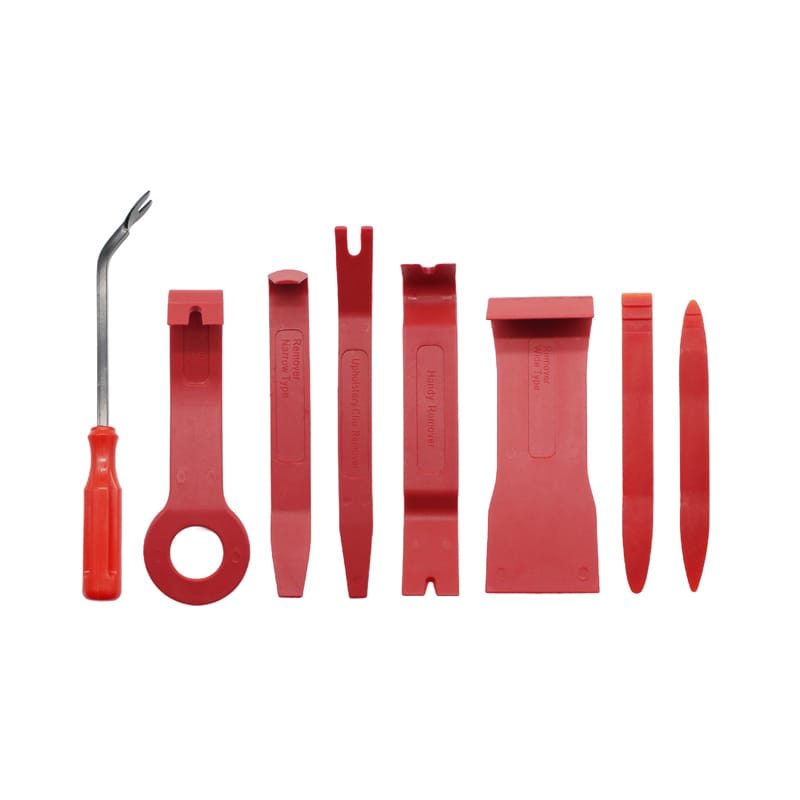
A common mistake is continuing to pry a panel after it becomes clear that a clip is still holding it.
At that point, the better tool may be a dedicated clip remover.
A clip remover places force closer to the base of the fastener.
This is particularly useful for:
- Push-type retainers
- Upholstery clips
- Door panel fasteners
- Fender liners
- Underbody trim
- Window trim retainers
Fengjie’s Car Trim Panel Clip Cutter Puller Fastener Remover is designed for trim, door panels, window trim, clips, fasteners and related vehicle components.
This illustrates an important purchasing principle:
A complete automotive trim range should contain both separation tools and fastener extraction tools.
They solve different parts of the same repair process.
What Professional Auto Glass Shops Should Keep in the Tool Cart
A dedicated automotive glass workstation can benefit from organizing tools by task rather than by product name.
| Task | Recommended Tool Type |
| Create initial trim gap | Nylon wedge |
| Protect visible surfaces | Wide plastic remover |
| Reach narrow molding seams | Thin trim tool |
| Release push clips | Forked clip remover |
| Reach hidden retainers | Hook tool |
| Remove stubborn fasteners | Metal clip remover |
| Remove door panels | Wide and narrow panel tools |
| Cut bonded windshield adhesive | Wire, cord, knife or powered cutter |
| Trim adhesive residue | Automotive scraper |
| Handle removed glass | Suitable glass handling equipment |
This system helps technicians choose the correct windshield molding removal tool based on the task rather than reaching for the same tool every time.
For adhesive and residue preparation after glass removal, Fengjie’s Automotive Scraper Tool Guide explains how scraper material should be matched to glass, painted, plastic, and other automotive surfaces.
How to Choose a Windshield Molding Removal Tool Kit
A kit should provide meaningful differences between tools.
Piece count alone is a poor buying criterion.
For professional applications, evaluate the following areas.
Tip Variety
The set should contain shapes that solve different access problems.
Several nearly identical wedges add little value.
Material Selection
A mixed workshop may benefit from both non-marring plastic tools and stronger fastener removers.
Tool Length
Short tools provide control in close work.
Longer tools can reach deeper clips and provide additional leverage.
Handle Design
The grip should remain comfortable when repeated pressure is applied.
Textured areas can improve control when gloves are used.
Tool Identification
When many similar tools are supplied in one case, markings or organized storage can help technicians quickly select the appropriate shape.
Storage
A case, tray, pouch, or organized holder reduces lost tools and makes missing components easier to identify.
A professional windshield molding removal tool kit should save time, not create additional searching during a repair.
Common Mistakes When Removing Windshield Molding
Using Too Much Force Too Early
Resistance is information.
It may indicate a hidden clip, incorrect removal direction, another overlapping part, or adhesive.
Inspect before increasing leverage.
Starting With a Sharp Metal Tool
Where the surrounding finish is visible, starting with nylon usually provides a larger safety margin.
Metal should be introduced when the application requires its strength or thin profile.
Levering Against Glass Edges
The edge of automotive glass is not an ideal leverage surface.
Avoid using the glass itself as the fulcrum for a windshield molding removal tool.
Pulling From the Middle of a Long Trim Piece
This can bend the molding while both ends remain retained.
Work progressively from known fastener locations.
Ignoring Clip Condition
A molding that was removed successfully can still fit poorly if damaged clips are reused.
Inspect every retention point before installation.
Using One Tool for Every Fastener
Push clips, locking tabs, molding channels, and weatherstrip retainers work differently.
Tool selection should follow the fastener design.
How Automotive Glass Safety Connects to Tool Selection
Automotive glazing is a safety-related vehicle component.
In the United States, glazing materials are addressed by Federal Motor Vehicle Safety Standard No. 205. The National Highway Traffic Safety Administration explains that the standard covers glazing used in motor vehicles and replacement glazing.
Technicians and buyers can review the NHTSA vehicle glazing information for additional regulatory context.
For professional windshield replacement procedures, the Auto Glass Safety Council provides access to information about automotive glass replacement standards.
These requirements do not prescribe which windshield molding removal tool a technician must use, but they reinforce an important point: automotive glass replacement is a structured repair process.
Trim removal is one small step within that larger process, and avoiding unnecessary vehicle damage helps create a better foundation for the work that follows.
Windshield Molding Tool Selection for Mobile Technicians
Mobile glass repair places different demands on tools than a fixed workshop.
Space is limited, so every tool needs a clear purpose.
A useful mobile set can prioritize:
- Compact nylon wedges
- Narrow trim tools
- Forked clip remover
- Hook tool
- One stronger metal fastener remover
- Organized pouch or case
Weight matters less than redundancy.
Carrying ten nearly identical trim wedges may offer less value than carrying five tools that address genuinely different access conditions.
A mobile windshield molding removal tool should also be easy to clean because technicians may encounter old adhesive, dirt, sealant, and weathered trim during outdoor work.
Selecting Tools for Door Glass and Window Regulator Repairs
The same principle applies beyond windshields.
Repairing a door window regulator frequently starts by removing the interior door panel.
The technician may need to release:
- Door handle trim
- Switch panels
- Armrest covers
- Speaker trim
- Hidden screws
- Push clips
- Weather barriers
- Window seals
After the panel is removed, additional access may be required around the regulator, motor, guide rails, and glass attachment points.
A windshield molding removal tool kit with several plastic wedges can assist with some of these operations, but a dedicated door repair setup may also require clip removers, hook tools, picks, and fastener tools.
This is why automotive glass and window repair tools work well as a connected product category rather than separate unrelated products.
Building an Automotive Door and Window Repair Tool Range
For distributors, the category can be structured around actual repair stages.
Exterior Trim Preparation
Products can include:
- Windshield molding tools
- Weatherstrip removers
- Cowl trim tools
- Wiper arm pullers
- Clip removers
Interior Door Access
Products can include:
- Door panel removal tools
- Upholstery removers
- Switch panel tools
- Hook tools
- Fastener pullers
Automotive Glass Removal
Products can include:
- Cutting wire
- Wire handles
- Windshield knives
- Glass cutting accessories
- Adhesive tools
Surface Preparation
Products can include:
- Plastic scrapers
- Metal scrapers
- Razor-type tools
- Adhesive residue tools
Glass and Window Installation
Product development can then move toward:
- Glass handling tools
- Positioning aids
- Trim installation tools
- Seal and molding tools
This product architecture also creates a strong SEO structure because individual blog topics can support specific product groups while still reinforcing the larger automotive glass repair theme.
What B2B Buyers Should Test Before Ordering
A distributor evaluating a windshield molding removal tool should test more than appearance.
Flex Test
Apply controlled bending to nylon tools and observe whether they return to shape.
Excessively soft tools may not provide enough leverage, while overly brittle plastic can crack under workshop use.
Tip Test
Insert the tool into several representative trim gaps.
Evaluate whether the leading edge is thin enough to enter without excessive force.
Surface Test
Use the tool against sample plastic and finished surfaces to evaluate scratching or marking.
Clip Engagement Test
For forked removers, verify whether the tool reaches underneath common clip heads and applies force evenly.
Repeated Use Test
Operate the same tool repeatedly.
Look for:
- Tip deformation
- Cracking
- Permanent bending
- Handle discomfort
- Edge damage
Batch Comparison
Compare multiple pieces from different cartons or production samples.
Consistent dimensions matter more in wholesale supply than one excellent demonstration sample.
OEM and Private-Label Considerations
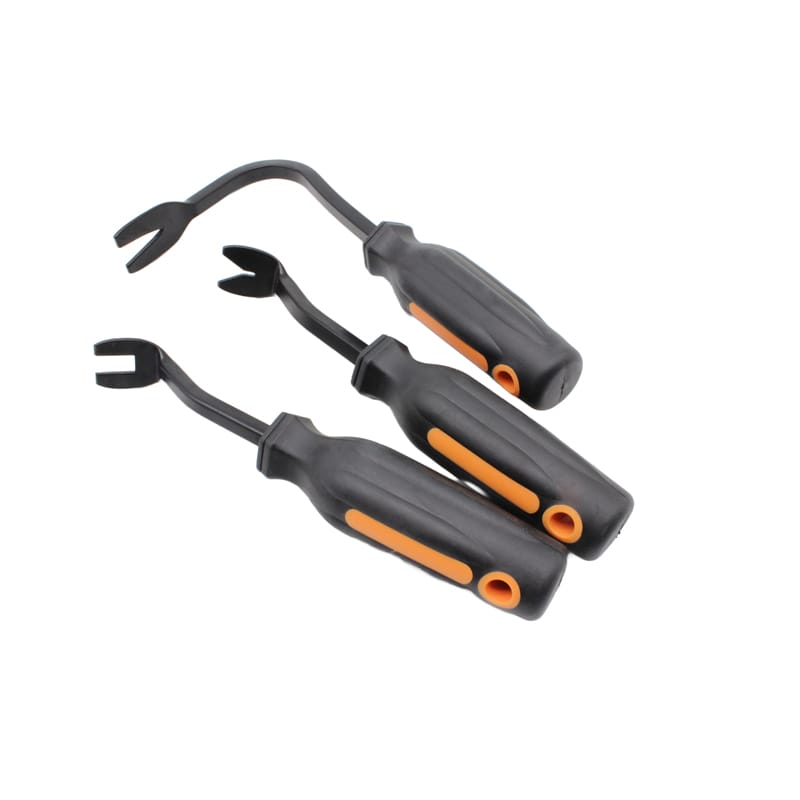
For private-label programs, product development should begin with application requirements rather than packaging graphics.
Useful specification points include:
- Tool material
- Hardness or flexibility target
- Tool length
- Tip width
- Fork opening
- Tip thickness
- Surface texture
- Handle shape
- Product color
- Kit configuration
- Storage design
The windshield molding removal tool can then be packaged according to the target customer.
For example, a general automotive retailer may prefer a compact multi-purpose kit, while a professional auto glass distributor may need more specialized profiles.
Replacement tools are another consideration.
If one commonly used narrow wedge wears faster than the rest of the kit, providing it separately can improve the long-term value of the product line.
Buyers developing automotive glass, door, or window repair tool ranges can contact Fengjie Tools to discuss tool combinations, OEM packaging, private-label configurations, and application requirements.
FAQ
What is a windshield molding removal tool used for?
A windshield molding removal tool is used to release trim, molding, clips, retainers, and related components around automotive glass.
Different tool shapes may be used for different fastener systems.
Can I remove windshield molding with a screwdriver?
It may be physically possible in some cases, but a screwdriver can concentrate force on trim or painted surfaces.
Purpose-designed nylon or clip removal tools generally provide more appropriate leverage for professional trim work.
Is a nylon or metal molding removal tool better?
Neither is better for every application.
Nylon is useful around visible and easily marked surfaces. Metal provides more strength and can reach stubborn or recessed fasteners.
Professional workshops generally benefit from both.
How do I remove windshield molding without breaking the clips?
Identify the clip location and release direction before applying significant force.
Position the tool as close to the retaining point as possible and increase pressure gradually rather than pulling the entire molding away from the vehicle.
What tool removes windshield clips?
Forked clip removers, fastener tools, and specialized molding tools are commonly used.
The correct shape depends on the clip design and available access.
Can windshield molding removal tools be used on door panels?
Many plastic trim tools can be used on door panels, window trim, dashboards, upholstery panels, and other automotive interior or exterior components.
However, very strong door fasteners may require a dedicated clip remover.
What tools do I need for automotive window repair?
A professional set may include door panel tools, clip removers, molding tools, hooks, picks, scrapers, glass removal equipment, and appropriate glass handling tools.
The exact selection depends on whether the work involves a windshield, side window, regulator, weatherstrip, or trim system.
Why does windshield molding break during removal?
Common reasons include aged material, incorrect pulling direction, hidden clips, excessive leverage, cold or brittle trim, or applying force too far from the retaining point.
Using the right windshield molding removal tool helps control force but does not eliminate the need to identify the retention system.
Are more pieces better in a molding removal kit?
Not necessarily.
A useful kit needs different profiles for different applications. Ten nearly identical tools may provide less coverage than a smaller set containing wide, narrow, forked, hook, and fastener-removal designs.
What should wholesalers check when sourcing molding removal tools?
Important factors include material consistency, flexibility, tip thickness, edge finish, tool geometry, clip engagement, durability, storage, packaging, and batch-to-batch consistency.
Conclusion
The best windshield molding removal tool is not simply the strongest pry tool in the workshop.
Successful molding removal depends on understanding how the trim is retained, finding the correct working point, selecting an appropriate material and tip shape, and applying force in the direction the fastener was designed to release.
Nylon wedges provide valuable surface protection around visible automotive components. Narrow tools improve access. Forked removers concentrate force around clips. Metal tools provide additional strength when stubborn fasteners require it.
For professional auto glass shops, the most practical solution is therefore a small system of complementary tools rather than one universal remover.
For distributors and OEM buyers, the same principle should guide product development. A strong automotive glass and window repair range should connect windshield molding tools with door panel removers, clip tools, automotive glass removal equipment, scrapers, wiper tools, and other products used throughout the actual repair workflow.
As vehicle trim becomes more tightly integrated around glass, sensors, panels, weatherstrips, and concealed fasteners, controlled access becomes increasingly important. A well-designed windshield molding removal tool gives technicians that control while helping reduce unnecessary damage and rework.