
An automotive hose can look easy to remove until it has been exposed to years of heat, pressure, vibration, and coolant or oil residue. A hose that once fitted loosely may become bonded to its connection by age, compression, and hardened deposits. Pulling harder is rarely the best first move. Excessive force can damage the hose, break a plastic connector, bend a metal fitting, or turn a routine maintenance job into a more expensive repair.
An automotive hose removal tool helps technicians work around these problems with better control. Depending on the hose design and location, the right tool may be a hose pick, a curved removal hook, a dedicated hose separator, or a combination of hand tools used in a careful sequence.
This guide explains how automotive hose removal tools work, which designs are suitable for different jobs, how to remove stubborn hoses more safely, and what repair shops and wholesale buyers should evaluate when choosing a tool set.
What Is an Automotive Hose Removal Tool?

An automotive hose removal tool is a hand tool designed to help separate a hose from a pipe, nipple, fitting, or other connection during vehicle maintenance and repair.
After prolonged use, a rubber hose can adhere closely to the surface underneath it. The hose may remain difficult to move even after its clamp has been loosened or removed. A suitable removal tool helps break this initial bond so the technician can continue with controlled movement rather than relying entirely on pulling force.
Common tool designs include:
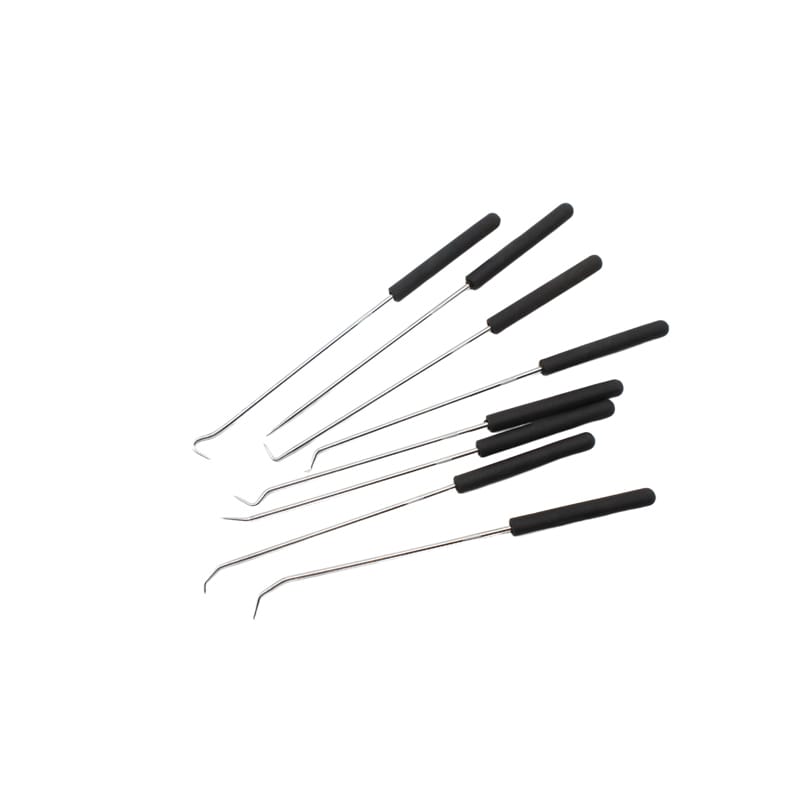
- Hose removal picks: Narrow tips that enter the edge between the hose and its fitting.
- Curved hose hooks: Bent tips designed to reach around a hose connection or access a restricted area.
- Angled hooks: Profiles that provide a useful approach when a straight tool cannot reach the hose edge.
- Long-reach tools: Extended shafts for connections located deep inside an engine bay.
- Hose clamp pliers: Tools designed to release particular types of hose clamps.
- Dedicated hose separators: Tools shaped to help separate a stuck hose from its connection.
These tools do not all perform the same job. A hose hook helps separate a hose from its fitting, while hose clamp pliers are used to release a compatible clamp. A tool kit should be selected according to the actual service tasks rather than the number of pieces included.
For repair shops, an automotive hose removal tool is particularly useful when working with older hoses, confined engine compartments, and connections that cannot be reached comfortably by hand.
Why Do Automotive Hoses Become Stuck?
Understanding why a hose is difficult to remove helps determine the safest approach.
1. Heat and Aging
Engine-compartment hoses experience repeated heating and cooling. Over time, the hose material may harden, lose flexibility, or become less willing to release from the fitting.
Aged hoses should be inspected carefully before removal. If the hose is cracked, brittle, swollen, or otherwise deteriorated, it may break apart during handling. In that situation, the objective should be controlled removal and replacement rather than preserving a hose that is no longer serviceable.
2. Compression Around the Fitting
A hose clamp compresses the hose around its connection. Even after the clamp has been released, the hose may retain its compressed shape and remain tightly fitted.
The hose may also have formed a close seal around a raised bead or retaining feature. Pulling straight outward can therefore require more force than expected.
A suitable hose removal tool can help release the edge of the hose before the technician attempts to move it farther.
3. Residue and Surface Deposits
Coolant residue, oil contamination, dirt, and other deposits may accumulate around hose connections. Depending on the system and maintenance history, these deposits can contribute to a stubborn joint.
The correct response depends on the material and fluid involved. Avoid applying an unapproved solvent or lubricant simply to make the hose slide more easily. Some chemicals can damage rubber, plastic, seals, or nearby components.
4. Restricted Access
A hose may be easy to reach but difficult to approach at the correct angle. Nearby wiring, brackets, intake components, covers, and other parts can limit hand movement.
This is where a narrow or angled automotive hose removal tool can be more useful than a larger general-purpose tool. The aim is to reach the connection without levering against surrounding components.
The Main Types of Automotive Hose Removal Tools
Choosing the right tool begins with understanding the shape of the connection and the space available.
Hose Picks and Removal Hooks
A hose pick or removal hook has a narrow working end that can enter the edge between a hose and its fitting. The tip helps loosen the hose from the connection so it can be moved with controlled hand pressure.
Different tip profiles serve different access conditions:
- Straight tips for accessible hose edges.
- Angled tips for connections approached from the side.
- Curved hooks for reaching around a fitting.
- Longer profiles for recessed or obstructed connections.
The tip should be selected to match the opening and connection geometry. A tip that is too large may not enter the gap, while an excessively sharp or aggressively used tip may puncture the hose or scratch the fitting.
Fengjie’s Pick & Hook tool category includes several hook-and-pick tool options that can support precision access tasks in automotive maintenance.
Hose Clamp Pliers
Hose clamp pliers are designed to release compatible clamp mechanisms. Different clamps require different approaches, so technicians should identify the clamp type before choosing a tool.
Do not assume that a hose removal hook can safely release every clamp. The hook and the clamp pliers have different functions, and using the wrong tool may damage the clamp or nearby parts.
Long-Reach Hand Tools
Long-reach tools can help when a hose connection sits behind other components or deep inside an engine bay.
Reach alone is not enough. A long shaft can magnify the effect of hand movement at the tip, so precise control matters. Avoid applying excessive leverage against plastic fittings, wiring connectors, radiator necks, or other fragile parts.
General-Purpose Picks and Hooks
General-purpose picks and hooks are useful for several precision tasks, including working around seals, small retainers, and narrow openings. Their versatility can be valuable in a workshop, but they should still be used within their intended limits.
A small hook is not a substitute for a dedicated clamp tool when a clamp requires a specific release mechanism. Nor should a sharp pick be used as a pry bar.
How to Remove a Stuck Automotive Hose Safely
The best removal method depends on the vehicle, hose material, connection design, and service procedure. The following sequence provides a general framework; always follow the vehicle manufacturer’s instructions for the system being serviced.
Step 1: Identify the Hose and System
Before touching the connection, determine what the hose carries and what components it connects.
Automotive hoses may be associated with cooling, vacuum, ventilation, fuel, washer, or other systems. Their materials, operating conditions, and safety requirements differ.
Never treat every hose as an ordinary rubber tube. If the system involves fuel, refrigerant, pressurized fluid, hot coolant, or another hazardous medium, use the correct service procedure and precautions.
Step 2: Make the Vehicle Safe to Work On
Switch off the engine and follow the required shutdown procedure. Allow hot components and fluids to cool before beginning work.
For cooling-system work, never remove a pressure cap from a hot, pressurized system. For fuel or other regulated systems, follow the specified depressurization and isolation procedure. Disconnect electrical power where the vehicle manufacturer’s instructions require it.
Wear appropriate eye protection and gloves, and manage any fluid that may escape from the connection.
Step 3: Inspect the Hose and Fitting
Look for cracks, swelling, corrosion, brittle material, damaged retaining beads, and signs of leakage.
Check whether the hose is attached to a metal pipe, plastic nipple, quick connector, or another fitting. Identify any retaining clips or locking features that must be released before the hose can be removed.
If the hose is badly deteriorated, avoid inserting a sharp tool deeply into the material. A damaged hose may split or shed fragments during removal.
Step 4: Release the Clamp Correctly
Use a compatible clamp tool to release or reposition the clamp. Move it far enough away from the hose end to allow the connection to separate.
Do not cut or deform a reusable clamp unless the service procedure calls for replacement. If the clamp is corroded or damaged, determine whether it should be replaced before reassembly.
Step 5: Break the Initial Bond
Select an automotive hose removal tool with a tip that fits the available gap. Work gently around the accessible edge of the hose, using small movements to help separate the hose from the fitting.
The tool should work against the hose-to-fitting interface, not against a fragile plastic neck or nearby component.
Avoid driving the tip deeply into the hose wall. If the hose is to be reused, punctures and cuts may make it unsafe. If it must be replaced, controlled removal still matters because the fitting underneath may be expensive or difficult to access.
Step 6: Rotate or Move the Hose Carefully
Once the hose begins to release, try a small controlled twisting movement if the connection design permits it.
Do not twist a quick connector, plastic elbow, or fixed pipe as though it were a flexible hose. Some assemblies require a specific release button, clip, or locking procedure rather than a twisting action.
If the hose remains stuck, stop and reassess the connection instead of applying steadily increasing force.
Step 7: Remove the Hose and Inspect the Connection
After the hose releases, remove it without pulling against adjacent wiring or components.
Inspect the fitting for cracks, corrosion, scoring, deformation, or damaged retaining features. Check the hose condition and determine whether it can be reused under the manufacturer’s criteria.
Before installing a replacement, verify the correct hose specification, routing, clamp position, and connection method. After reassembly, complete the required leak checks and any system-specific verification.
Common Mistakes to Avoid
A good automotive hose removal tool improves control, but incorrect technique can still cause damage.
Pulling Hard Before Releasing the Hose
Strong pulling may stretch or tear the hose while leaving the bond at the fitting intact. Begin by releasing the connection at its edge, then use controlled movement.
Using a Sharp Pick Too Aggressively
A sharp tip can enter a narrow gap, but it can also puncture rubber or damage a soft fitting. Use the smallest practical movement and avoid treating the tool as a cutting instrument.
Levering Against Plastic Connections
Plastic fittings can crack under concentrated loads. Avoid using the fitting as a fulcrum, especially when it is old, heat-exposed, or difficult to inspect.
Confusing Clamp Removal With Hose Separation
Releasing the clamp does not guarantee that the hose is free. Conversely, trying to separate a hose before releasing its clamp may damage the hose or fitting. Handle these as separate steps.
Using One Tool for Every Hose
A short straight pick may work on an accessible connection but be unsuitable for a recessed hose. A clamp plier may release the clamp but cannot necessarily break the hose’s bond to its fitting.
A practical tool selection should account for access, hose material, fitting design, and the type of clamp.
Ignoring the Vehicle-Specific Procedure
Modern vehicles may use quick connectors, locking tabs, special clamps, and system-specific procedures. If a connection does not release using the expected method, consult the relevant service information rather than forcing it.
Choosing an Automotive Hose Removal Tool for Different Applications
The best tool depends on the service environment.
| Application | Main challenge | Tool selection considerations |
|---|---|---|
| Cooling-system hoses | Heat exposure and stuck connections | Appropriate hose hook, clamp tool, and fitting protection |
| Vacuum hoses | Small diameter and limited grip | Fine tip and controlled hand movement |
| Ventilation hoses | Restricted routing and connectors | Angled or long-reach profile where suitable |
| Washer-system hoses | Small fittings and plastic parts | Gentle separation and careful connector inspection |
| General engine-bay service | Crowded access | A selection of tip profiles and useful reach |
| Older or deteriorated hoses | Brittle material | Inspection, controlled removal, and likely replacement |
This table is a selection guide, not a guarantee that one tool works for every vehicle. The service manual and actual connection design should determine the procedure.
What Makes a Good Automotive Hose Removal Tool Set?
For professional repair shops, the usefulness of a tool set depends on its working range, control, durability, and organization.
1. Useful Tip Profiles
A set should provide genuinely different access angles. Straight, angled, and curved tips can address different connection layouts.
Adding multiple tools that perform essentially the same task may increase the piece count without improving practical coverage.
2. Suitable Reach
A compact tool may provide better control in open areas, while a longer tool may help reach a recessed connection. The shaft should be long enough for the application without making the tip difficult to control.
3. Appropriate Tip Construction
The tip needs to be suitable for its intended use. It should maintain its shape during normal handling and allow controlled movement at the hose edge.
No metal tip should be assumed safe for every plastic fitting or reusable hose. Tool geometry and user technique remain important.
4. Comfortable Grip
A secure, comfortable handle can make small movements easier to control. For technicians who perform repeated service work, grip shape, surface texture, and overall balance can affect daily usability.
5. Clear Organization
A storage solution helps users identify the correct profile quickly and reduces the risk of losing small tools. For workshops and distributors, clear tool identification also makes inventory management and kit presentation easier.
6. Quality Consistency
Professional buyers should assess material specifications, tip finishing, handle assembly, dimensional consistency, packaging, and inspection procedures.
For repeat orders, consistency between production batches matters as much as the appearance of an individual sample.
A Practical Buying Checklist for Repair Shops and Distributors
Before choosing an automotive hose removal tool or tool set, consider these questions:
- What types of hoses and fittings will the tool be used on?
- Are the common connections easy to access, or are long-reach profiles required?
- Which tip shapes are genuinely useful for the target applications?
- Does the set include the correct clamp-release tools where needed?
- Are the tips and handles suitable for repeated professional use?
- Is the kit organized so users can identify the right tool quickly?
- Can the supplier provide clear product specifications and consistent packaging?
- For private-label programs, can the configuration, branding, and packaging be aligned with the target market?
A tool set should be built around the real work performed by its users. Repair shops may prioritize practical coverage and daily durability. Distributors may also consider product range compatibility, packaging, and replenishment. OEM buyers may require additional review of specifications, labeling, inspection requirements, and production consistency.
OEM and Wholesale Sourcing Considerations

For distributors and tool brands, automotive hose removal tools can complement broader automotive hand-tool categories. The key is to build a useful product range rather than combine unrelated tools merely to increase the set size.
When evaluating a supplier, clarify the intended application, material requirements, tool profiles, packaging format, and any customization requirements before confirming the final specification.
Ask for product details that can be checked, including dimensions, materials, component lists, packaging information, and quality-control arrangements. Where the tool is intended for a specific type of fitting, verify that its geometry suits that use.
Fengjie Tools supplies automotive repair tools and hand tools, including products within its Pick & Hook category. Buyers exploring wholesale supply or product customization can contact the company through its official contact page to discuss requirements.
For a wider understanding of automotive repair tool selection, the Automotive Scraper Tool Guide explains why tool material and working surface should be considered together. Although scrapers and hose hooks perform different jobs, the same selection principle applies: match the tool to the task rather than expecting one design to solve every problem.
FAQ
What is an automotive hose removal tool used for?
It helps separate a stuck hose from a pipe, nipple, or fitting during vehicle maintenance. Depending on the design, it may use a narrow pick or curved hook to release the edge of the hose before removal.
How do you remove a hose that is stuck to a fitting?
First make the vehicle and system safe, release the compatible clamp, and inspect the hose and fitting. Then use a suitable hose removal tool to gently break the bond at the hose edge. Avoid excessive pulling or levering against fragile fittings, and follow the vehicle-specific service procedure.
Can a hose pick damage a rubber hose?
Yes. A sharp tip can puncture or cut the hose if inserted too deeply or used aggressively. If the hose must be reused, take particular care to avoid damaging its inner or outer wall. Replace hoses that do not meet the applicable service criteria.
Is a hose removal tool the same as hose clamp pliers?
No. A hose removal tool helps separate the hose from its fitting. Hose clamp pliers release compatible clamp designs. Some jobs require both types of tool.
Do I need different tools for different hose sizes?
Not every hose requires a different tool, but diameter, fitting geometry, access, and material can affect tool selection. A selection of suitable tip profiles may be more practical than relying on a single tool.
What should distributors check when sourcing hose removal tools?
Review the intended applications, tool geometry, materials, workmanship, packaging, batch consistency, and supplier communication. For OEM or private-label orders, confirm the final specifications and inspection requirements before production.
Can a general-purpose hook tool be used for automotive hoses?
A suitable hook may help with certain hose-separation tasks, provided its shape, material, and working end are appropriate. It should not replace a dedicated clamp-release tool or a vehicle-specific connector release method when those are required.
Conclusion
An automotive hose removal tool is a small but useful part of a well-organized repair toolkit. Its value comes from controlled access and separation, not from applying more force. The right profile can help technicians release a stuck hose while reducing the risk of damage to reusable hoses, plastic connectors, and surrounding components.
For individual technicians, the priority is to match the tool to the hose, fitting, and access conditions. For repair shops and professional buyers, a practical set should combine useful tip profiles, suitable reach, comfortable handling, and consistent construction.
For distributors and OEM buyers, the same principles support better product selection: define the real application, verify the specifications, and build a range that solves identifiable service problems.
Explore Fengjie’s Pick & Hook tools or contact the team to discuss automotive hand-tool sourcing and product requirements.